Troubleshooting
Debug Messages
The Bareos programs contain a lot of debug messages. Normally, these are not printed. See the setdebug chapter about how to enable them.
Client Access Problems
There are several reasons why a Bareos Director could not contact a client on a different machine. They are:
- Check if the client file daemon is really running.
- The Client address or port is incorrect or not resolved by DNS. See if you can ping the client machine using the same address as in the Client record.
- You have a firewall, and it is blocking traffic on port 9102 between the Director’s machine and the Client’s machine (or on port 9103 between the Client and the Storage daemon machines).
- If your system is using Tcpwrapper (
hosts.alloworhosts.denyfile), verify that is permitting access. - Your password or names are not correct in both the Director and the Client machine. Try configuring everything identical to how you run the client on the same machine as the Director, but just change the address. If that works, make the other changes one step at a time until it works.
Some of the DNS and Firewall problems can be circumvented by configuring clients using Client Initiated Connection or as Passive Clients.
Difficulties Connecting from the FD to the SD
If you are having difficulties getting one or more of your File daemons to connect to the Storage daemon, it is most likely because you have not used a fully qualified domain name on the Address (Dir->Storage) directive. That is the resolver on the File daemon’s machine (not on the Director’s) must be able to resolve the name you supply into an IP address. An example of an address that is guaranteed not to work: localhost. An example that
may work: bareos-sd1. An example that is more likely to work: bareos-sd1.example.com.
You can verify how a Bareos File Daemon resolves a DNS name by the following command:
\begin{bconsole}{Test DNS resolution of the \bareosFd \name{bareos-fd}}
*<input>resolve client=bareos-fd NONEXISTINGHOSTNAME</input>
Connecting to Client bareos-fd at bareos:9102
bareos-fd: Failed to resolve NONEXISTINGHOSTNAME
*<input>resolve client=bareos-fd bareos-sd1.example.com</input>
Connecting to Client bareos-fd at bareos:9102
bareos-fd resolves bareos-sd1.example.com to host[ipv4;192.168.0.1]
\end{bconsole}
If your address is correct, then make sure that no other program is using the port 9103 on the Storage daemon’s machine. The Bacula project has reserved these port numbers by IANA, therefore they should only be used by Bacula and its replacements like Bareos. However, apparently some HP printers do use these port numbers. A netstat -lntp on the Bareos Storage Daemon’s machine can determine who is listening on the 9103 port (used for FD to SD communications in Bareos).
Authorization Errors
During the authorization process, the Storage daemon and File daemon also require that the Director authenticates itself, so both ends require the other to have the correct name and password.
If you have edited the configuration files and modified any name or any password, and you are getting authentication errors, then your best bet is to go back to the original configuration files generated by the Bareos installation process. Make only the absolutely necessary modifications to these files – e.g. add the correct email address. Then follow the instructions in the Running Bareos chapter of this manual. You will run a backup to disk and a restore. Only when that works, should you begin customization of the configuration files.
Some users report that authentication fails if there is not a proper reverse DNS lookup entry for the machine. This seems to be a requirement of gethostbyname(), which is what Bareos uses to translate names into IP addresses. If you cannot add a reverse DNS entry, or you don’t know how to do so, you can avoid the problem by specifying an IP address rather than a machine name in the appropriate Bareos configuration file.
Here is a picture that indicates what names/passwords in which files/Resources must match up:
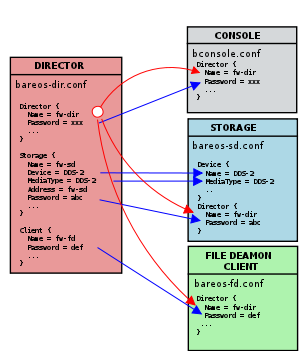
In the left column, you will find the Director, Storage, and Client resources, with their names and passwords – these are all in the Bareos Director configuration. The right column is where the corresponding values should be found in the Console, Storage daemon (SD), and File daemon (FD) configuration files.
Another thing to check is to ensure that the Bareos component you are trying to access has Maximum Concurrent Jobs set large enough to handle each of the Jobs and the Console that want to connect simultaneously. Once the maximum connections has been reached, each Bareos component will reject all new connections.
Concurrent Jobs
Bareos can run multiple concurrent jobs. Using the Maximum Concurrent Jobs directives, you can configure how many and which jobs can be run simultaneously:
Bareos Director
Bareos Storage Daemon
Bareos File Daemon
For example, if you want two different jobs to run simultaneously backing up the same Client to the same Storage device, they will run concurrently only if you have set Maximum Concurrent Jobs greater than one in the Director (Dir) resource, the Client (Dir) resource, and the Storage (Dir) resource in Bareos Director configuration.
When running concurrent jobs without Data Spooling, the volume format becomes more complicated, consequently, restores may take longer if Bareos must sort through interleaved volume blocks from multiple simultaneous jobs. This can be avoided by having each simultaneous job write to a different volume or by using data spooling We recommend that you read the Data Spooling of this manual first, then test your multiple concurrent backup including restore testing before you put it into production.
When using random access media as backup space (e.g. disk), you should also read the chapter about Concurrent Disk Jobs.
Below is a super stripped down bareos-dir.conf file showing you the four places where the the file must be modified to allow the same job NightlySave (Dir->Job) to run up to four times concurrently. The change to the Job resource is not necessary if you want different Jobs to run at the same time, which is the normal case.
Media VolWrites: integer out of range
In some situation, you receive an error message similar to this:
12-Apr 15:10 bareos-dir JobId 15860: Fatal error: Catalog error updating Media record. sql_update.c:385 update UPDATE Media SET VolJobs=12,VolFiles=10,VolBlocks=155013,VolBytes=10000263168,VolMounts=233,VolErrors=0,VolWrites=2147626019,MaxVolBytes=0,VolStatus='Append',Slot=1,InChanger=1,VolReadTime=0,VolWriteTime=842658562655,LabelType=0,StorageId=3,PoolId=2,VolRetention=144000,VolUseDuration=82800,MaxVolJobs=0,MaxVolFiles=0,Enabled=1,LocationId=0,ScratchPoolId=0,RecyclePoolId=0,RecycleCount=201,Recycle=1,ActionOnPurge=0,MinBlocksize=0,MaxBlocksize=0 WHERE VolumeName='000194L5' failed:
ERROR: integer out of range
The database column VolWrites in the Media table stores the number of write accesses to a volume. It is only used for statistics.
However, it has happened that the number of write accesses exceeds the maximum value supported by the database column (on PostgreSQL it is currently 2147483647, 32 bit, signed integer). The result is a database error, similar to the one mentioned above.
As a temporary fix, just reset this counter:
1000 OK: bareos-dir Version: 17.2.5 (14 Feb 2018)
Enter a period to cancel a command.
*sqlquery
Automatically selected Catalog: MyCatalog
Using Catalog "MyCatalog"
Entering SQL query mode.
Terminate each query with a semicolon.
Terminate query mode with a blank line.
Enter SQL query: UPDATE Media SET VolWrites = 0 WHERE VolWrites > '2000000000';
No results to list.
SELECT volwrites FROM media; volwrites > '0';
+-----------+
| volwrites |
+-----------+
|         0 |
|         0 |
|         0 |
|         0 |
+-----------+
Enter SQL query:
In the long run, it is planed to modify the database schema to enable storing much larger numbers.
Tape Labels: ANSI or IBM
By default, Bareos uses its own tape label (see Tape Formats and Label Type (Dir->Pool)). However, Bareos also supports reading and write ANSI and IBM tape labels.
Reading
Reading ANSI/IBM labels is important, if some of your tapes are used by other programs that also support ANSI/IBM labels. For example, LTFS tapes are indicated by an ANSI label.
If your are running Bareos in such an environment, you must set Check Labels (Sd->Device) to yes, otherwise Bareos will not recognize that these tapes are already in use.
Writing
To configure Bareos to also write ANSI/IBM tape labels, use Label Type (Dir->Pool) or Label Type (Sd->Device). With the proper configuration, you can force Bareos to require ANSI or IBM labels.
Even though Bareos will recognize and write ANSI and IBM labels, it always writes its own tape labels as well.
If you have labeled your volumes outside of Bareos, then the ANSI/IBM label will be recognized by Bareos only if you have created the HDR1 label with BAREOS.DATA in the filename field (starting with character 5). If Bareos writes the labels, it will use this information to recognize the tape as a Bareos tape. This allows ANSI/IBM labeled tapes to be used at sites with multiple machines and multiple backup programs.
Tape Drive
This chapter is concerned with testing and configuring your tape drive to make sure that it will work properly with Bareos using the btape program.
Get Your Tape Drive Working
In general, you should follow the following steps to get your tape drive to work with Bareos. Start with a tape mounted in your drive. If you have an autochanger, load a tape into the drive. We use /dev/nst0 as the tape drive name, you will need to adapt it according to your system.
Do not proceed to the next item until you have succeeded with the previous one.
Make sure that Bareos (the Storage daemon) is not running or that you have unmounted the drive you will use for testing.
Use tar to write to, then read from your drive:
mt -f /dev/nst0 rewind
tar cvf /dev/nst0 .
mt -f /dev/nst0 rewind
tar tvf /dev/nst0
Make sure you have a valid and correct Device resource corresponding to your drive. For Linux users, generally, the default one works. For FreeBSD users, there are two possible Device configurations (see below). For other drives and/or OSes, you will need to first ensure that your system tape modes are properly setup (see below), then possibly modify you Device resource depending on the output from the btape program (next item). When doing this, you should consult the Storage Daemon Configuration of this manual.
If you are using a Fibre Channel to connect your tape drive to Bareos, please be sure to disable any caching in the NSR (network storage router, which is a Fibre Channel to SCSI converter).
Run the btape test command:
btape /dev/nst0
test
It isn’t necessary to run the autochanger part of the test at this time, but do not go past this point until the basic test succeeds. If you do have an autochanger, please be sure to read the Autochanger chapter of this manual.
Run the btape fill command, preferably with two volumes. This can take a long time. If you have an autochanger and it is configured, Bareos will automatically use it. If you do not have it configured, you can manually issue the appropriate mtx command, or press the autochanger buttons to change the tape when requested to do so.
Run Bareos, and backup a reasonably small directory, say 60 Megabytes. Do three successive backups of this directory.
Stop Bareos, then restart it. Do another full backup of the same directory. Then stop and restart Bareos.
Do a restore of the directory backed up, by entering the following restore command, being careful to restore it to an alternate location:
restore select all done
yes
Do a diff on the restored directory to ensure it is identical to the original directory. If you are going to backup multiple different systems (Linux, Windows, Mac, Solaris, FreeBSD, …), be sure you test the restore on each system type.
If you have an autochanger, you should now go back to the btape program and run the autochanger test:
btape /dev/nst0
auto
Adjust your autochanger as necessary to ensure that it works correctly. See the Autochanger chapter of this manual for a complete discussion of testing your autochanger.
Autochanger
Testing Autochanger and Adapting mtx-changer script
In case, Bareos does not work well with the Autochanger, it is preferable to “hand-test” that the changer works. To do so, we suggest you do the following commands:
Make sure Bareos is not running.
/usr/lib/bareos/scripts/mtx-changer /dev/sg0 list 0 /dev/nst0 0
This command should print:
1:
2:
3:
...
or one number per line for each slot that is occupied in your changer, and the number should be terminated by a colon (:). If your changer has barcodes, the barcode will follow the colon. If an error message is printed, you must resolve the problem (e.g. try a different SCSI control device name if /dev/sg0 is incorrect). For example, on FreeBSD systems, the autochanger SCSI control device is generally /dev/pass2.
/usr/lib/bareos/scripts/mtx-changer /dev/sg0 listall 0 /dev/nst0 0
This command should print:
Drive content:         D:Drive num:F:Slot loaded:Volume Name
D:0:F:2:vol2        or D:Drive num:E
D:1:F:42:vol42
D:3:E

Slot content:
S:1:F:vol1             S:Slot num:F:Volume Name
S:2:E               or S:Slot num:E
S:3:F:vol4

Import/Export tray slots:
I:10:F:vol10           I:Slot num:F:Volume Name
I:11:E              or I:Slot num:E
I:12:F:vol40
/usr/lib/bareos/scripts/mtx-changer /dev/sg0 transfer 1 2
This command should transfer a volume from source (1) to destination (2)
/usr/lib/bareos/scripts/mtx-changer /dev/sg0 slots
This command should return the number of slots in your autochanger.
/usr/lib/bareos/scripts/mtx-changer /dev/sg0 unload 1 /dev/nst0 0
If a tape is loaded from slot 1, this should cause it to be unloaded.
/usr/lib/bareos/scripts/mtx-changer /dev/sg0 load 3 /dev/nst0 0
Assuming you have a tape in slot 3, it will be loaded into drive (0).
/usr/lib/bareos/scripts/mtx-changer /dev/sg0 loaded 0 /dev/nst0 0
It should print “3” Note, we have used an “illegal” slot number 0. In this case, it is simply ignored because the slot number is not used. However, it must be specified because the drive parameter at the end of the command is needed to select the correct drive.
/usr/lib/bareos/scripts/mtx-changer /dev/sg0 unload 3 /dev/nst0 0
will unload the tape into slot 3.
Once all the above commands work correctly, assuming that you have the right Changer Command in your configuration, Bareos should be able to operate the changer. The only remaining area of problems will be if your autoloader needs some time to get the tape loaded after issuing the command. After the mtx-changer script returns, Bareos will immediately rewind and read the tape. If Bareos gets rewind I/O errors after a tape change, you will probably need to configure the
load_sleep paramenter in the config file /etc/bareos/mtx-changer.conf. You can test whether or not you need a sleep by putting the following commands into a file and running it as a script:
#!/bin/sh
/usr/lib/bareos/scripts/mtx-changer /dev/sg0 unload 1 /dev/nst0 0
/usr/lib/bareos/scripts/mtx-changer /dev/sg0 load 3 /dev/nst0 0
mt -f /dev/st0 rewind
mt -f /dev/st0 weof
If the above script runs, you probably have no timing problems. If it does not run, start by putting a sleep 30 or possibly a sleep 60 in the script just after the mtx-changer load command. If that works, then you should configure the load_sleep paramenter in the config file /etc/bareos/mtx-changer.conf to the specified value so that it will be effective when Bareos runs.
A second problem that comes up with a small number of autochangers is that they need to have the cartridge ejected before it can be removed. If this is the case, the load 3 will never succeed regardless of how long you wait. If this seems to be your problem, you can insert an eject just after the unload so that the script looks like:
#!/bin/sh
/usr/lib/bareos/scripts/mtx-changer /dev/sg0 unload 1 /dev/nst0 0
mt -f /dev/st0 offline
/usr/lib/bareos/scripts/mtx-changer /dev/sg0 load 3 /dev/nst0 0
mt -f /dev/st0 rewind
mt -f /dev/st0 weof
If this solves your problems, set the parameter offline in the config file /etc/bareos/mtx-changer.conf to “1”.
Restore
Restore a pruned job using a pattern
It is possible to configure Bareos in a way, that job information are still stored in the Bareos catalog, while the individual file information are already pruned.
If all File records are pruned from the catalog for a Job, normally Bareos can restore only all files saved. That is there is no way using the catalog to select individual files. With this new feature, Bareos will ask if you want to specify a Regex expression for extracting only a part of the full backup.
Building directory tree for JobId(s) 1,3 ...
There were no files inserted into the tree, so file selection
is not possible.Most likely your retention policy pruned the files

Do you want to restore all the files? (yes|no): no

Regexp matching files to restore? (empty to abort): /etc/.*
Bootstrap records written to /tmp/regress/working/zog4-dir.restore.1.bsr
See also FileRegex bsr option for more information.
Problems Restoring Files
The most frequent problems users have restoring files are error messages such as:
04-Jan 00:33 z217-sd: RestoreFiles.2005-01-04_00.31.04 Error:
block.c:868 Volume data error at 20:0! Short block of 512 bytes on
device /dev/tape discarded.
or
04-Jan 00:33 z217-sd: RestoreFiles.2005-01-04_00.31.04 Error:
block.c:264 Volume data error at 20:0! Wanted ID: "BB02", got ".".
Buffer discarded.
Both these kinds of messages indicate that you were probably running your tape drive in fixed block mode rather than variable block mode. Fixed block mode will work with any program that reads tapes sequentially such as tar, but Bareos repositions the tape on a block basis when restoring files because this will speed up the restore by orders of magnitude when only a few files are being restored. There are several ways that you can attempt to recover from this unfortunate situation.
Try the following things, each separately, and reset your Device resource to what it is now after each individual test:
- Set “Block Positioning = no” in your Device resource and try the restore. This is a new directive and untested.
- Set “Minimum Block Size = 512” and “Maximum Block Size = 512” and try the restore. If you are able to determine the block size your drive was previously using, you should try that size if 512 does not work. This is a really horrible solution, and it is not at all recommended to continue backing up your data without correcting this condition. Please see the Tape Drive section for more on this.
- Try editing the restore.bsr file at the Run xxx yes/mod/no prompt before starting the restore job and remove all the VolBlock statements. These are what causes Bareos to reposition the tape, and where problems occur if you have a fixed block size set for your drive. The VolFile commands also cause repositioning, but this will work regardless of the block size.
- Use bextract to extract the files you want – it reads the Volume sequentially if you use the include list feature, or if you use a .bsr file, but remove all the VolBlock statements after the .bsr file is created (at the Run yes/mod/no) prompt but before you start the restore.
Restoring Files Can Be Slow
Restoring files is generally much slower than backing them up for several reasons. The first is that during a backup the tape is normally already positioned and Bareos only needs to write. On the other hand, because restoring files is done so rarely, Bareos keeps only the start file and block on the tape for the whole job rather than on a file by file basis which would use quite a lot of space in the catalog.
Bareos will forward space to the correct file mark on the tape for the Job, then forward space to the correct block, and finally sequentially read each record until it gets to the correct one(s) for the file or files you want to restore. Once the desired files are restored, Bareos will stop reading the tape.
Finally, instead of just reading a file for backup, during the restore, Bareos must create the file, and the operating system must allocate disk space for the file as Bareos is restoring it.
For all the above reasons the restore process is generally much slower than backing up (sometimes it takes three times as long).
Restoring When Things Go Wrong
This and the following sections will try to present a few of the kinds of problems that can come up making restoring more difficult. We will try to provide a few ideas how to get out of these problem situations. In addition to what is presented here, there is more specific information on restoring a Client and your Server in the Disaster Recovery Using Bareos chapter of this manual.
- Problem
- My database is broken.
- Solution
For SQLite, use the vacuum command to try to fix the database. For either MySQL or PostgreSQL, see the vendor’s documentation. They have specific tools that check and repair databases, see the Catalog Maintenance sections of this manual for links to vendor information.
Assuming the above does not resolve the problem, you will need to restore or rebuild your catalog. Note, if it is a matter of some inconsistencies in the Bareos tables rather than a broken database, then running bareos-dbcheck might help, but you will need to ensure that your database indexes are properly setup.
- Problem
- How do I restore my catalog?
- Solution with a Catalog backup
If you have backed up your database nightly (as you should) and you have made a bootstrap file, you can immediately load back your database (or the ASCII SQL output). Make a copy of your current database, then re-initialize it, by running the following scripts:
./drop_bareos_tables
./make_bareos_tables
After re-initializing the database, you should be able to run Bareos. If you now try to use the restore command, it will not work because the database will be empty. However, you can manually run a restore job and specify your bootstrap file. You do so by entering the run command in the console and selecting the restore job. If you are using the default bareos-dir.conf, this Job will be named RestoreFiles. Most likely it will prompt you with something such as:
Run Restore job
JobName:    RestoreFiles
Bootstrap:  /home/user/bareos/working/restore.bsr
Where:      /tmp/bareos-restores
Replace:    always
FileSet:    Full Set
Client:     rufus-fd
Storage:    File
When:       2005-07-10 17:33:40
Catalog:    MyCatalog
Priority:   10
OK to run? (yes/mod/no):
A number of the items will be different in your case. What you want to do is: to use the mod option to change the Bootstrap to point to your saved bootstrap file; and to make sure all the other items such as Client, Storage, Catalog, and Where are correct. The FileSet is not used when you specify a bootstrap file. Once you have set all the correct values, run the Job and it will restore the backup of your database, which is most likely an ASCII dump.
You will then need to follow the instructions for your database type to recreate the database from the ASCII backup file. See the Catalog Maintenance chapter of this manual for examples of the command needed to restore a database from an ASCII dump (they are shown in the Compacting Your XXX Database sections).
Also, please note that after you restore your database from an ASCII backup, you do NOT want to do a make_bareos_tables command, or you will probably erase your newly restored database tables.
- Solution with a Job listing
If you did save your database but did not make a bootstrap file, then recovering the database is more difficult. You will probably need to use bextract to extract the backup copy. First you should locate the listing of the job report from the last catalog backup. It has important information that will allow you to quickly find your database file. For example, in the job report for the CatalogBackup shown below, the critical items are the Volume name(s), the Volume Session Id and the Volume Session Time. If you know those, you can easily restore your Catalog.
22-Apr 10:22 HeadMan: Start Backup JobId 7510,
Job=CatalogBackup.2005-04-22_01.10.0
22-Apr 10:23 HeadMan: Bareos 1.37.14 (21Apr05): 22-Apr-2005 10:23:06
  JobId:                  7510
  Job:                    CatalogBackup.2005-04-22_01.10.00
  Backup Level:           Full
  Client:                 Polymatou
  FileSet:                "CatalogFile" 2003-04-10 01:24:01
  Pool:                   "Default"
  Storage:                "DLTDrive"
  Start time:             22-Apr-2005 10:21:00
  End time:               22-Apr-2005 10:23:06
  FD Files Written:       1
  SD Files Written:       1
  FD Bytes Written:       210,739,395
  SD Bytes Written:       210,739,521
  Rate:                   1672.5 KB/s
  Software Compression:   None
  Volume name(s):         DLT-22Apr05
  Volume Session Id:      11
  Volume Session Time:    1114075126
  Last Volume Bytes:      1,428,240,465
  Non-fatal FD errors:    0
  SD Errors:              0
  FD termination status:  OK
  SD termination status:  OK
  Termination:            Backup OK
From the above information, you can manually create a bootstrap file, and then follow the instructions given above for restoring your database. A reconstructed bootstrap file for the above backup Job would look like the following:
Volume="DLT-22Apr05"
VolSessionId=11
VolSessionTime=1114075126
FileIndex=1-1
Where we have inserted the Volume name, Volume Session Id, and Volume Session Time that correspond to the values in the job report. We’ve also used a FileIndex of one, which will always be the case providing that there was only one file backed up in the job.
The disadvantage of this bootstrap file compared to what is created when you ask for one to be written, is that there is no File and Block specified, so the restore code must search all data in the Volume to find the requested file. A fully specified bootstrap file would have the File and Blocks specified as follows:
Volume="DLT-22Apr05"
VolSessionId=11
VolSessionTime=1114075126
VolFile=118-118
VolBlock=0-4053
FileIndex=1-1
Once you have restored the ASCII dump of the database, you will then to follow the instructions for your database type to recreate the database from the ASCII backup file. See the Catalog Maintenance chapter of this manual for examples of the command needed to restore a database from an ASCII dump (they are shown in the Compacting Your XXX Database sections).
Also, please note that after you restore your database from an ASCII backup, you do NOT want to do a make_bareos_tables command, or you will probably erase your newly restored database tables.
- Solution without a Job Listing
If you do not have a job listing, then it is a bit more difficult. Either you use the bscan program to scan the contents of your tape into a database, which can be very time consuming depending on the size of the tape, or you can use the bls program to list everything on the tape, and reconstruct a bootstrap file from the bls listing for the file or files you want following the instructions given above.
There is a specific example of how to use bls below.
- Problem
Trying to restore the last known good full backup by specifying item 3 on the restore menu then the JobId to restore, but Bareos then reports:
1 Job 0 Files
and restores nothing.
- Solution
Most likely the File records were pruned from the database either due to the File Retention period expiring or by explicitly purging the Job. By using the “llist jobid=nn” command, you can obtain all the important information about the job:
llist jobid=120
           JobId: 120
             Job: save.2005-12-05_18.27.33
        Job.Name: save
     PurgedFiles: 0
            Type: B
           Level: F
    Job.ClientId: 1
     Client.Name: Rufus
       JobStatus: T
       SchedTime: 2005-12-05 18:27:32
       StartTime: 2005-12-05 18:27:35
         EndTime: 2005-12-05 18:27:37
        JobTDate: 1133803657
    VolSessionId: 1
  VolSessionTime: 1133803624
        JobFiles: 236
       JobErrors: 0
 JobMissingFiles: 0
      Job.PoolId: 4
       Pool.Name: Full
   Job.FileSetId: 1
 FileSet.FileSet: BackupSet
Then you can find the Volume(s) used by doing:
sql
select VolumeName from JobMedia,Media where JobId=1 and JobMedia.MediaId=Media.MediaId;
Finally, you can create a bootstrap file as described in the previous problem above using this information.
Bareos will ask you if you would like to restore all the files in the job, and it will collect the above information and write the bootstrap file for you.
- Problem
- You don’t have a bootstrap file, and you don’t have the Job report for the backup of your database, but you did backup the database, and you know the Volume to which it was backed up.
- Solution
Either bscan the tape (see below for bscanning), or better use bls to find where it is on the tape, then use bextract to restore the database. For example,
./bls -j -V DLT-22Apr05 /dev/nst0
Might produce the following output:
bls: butil.c:258 Using device: "/dev/nst0" for reading.
21-Jul 18:34 bls: Ready to read from volume "DLT-22Apr05" on device "DLTDrive"
(/dev/nst0).
Volume Record: File:blk=0:0 SessId=11 SessTime=1114075126 JobId=0 DataLen=164
...
Begin Job Session Record: File:blk=118:0 SessId=11 SessTime=1114075126
JobId=7510
   Job=CatalogBackup.2005-04-22_01.10.0 Date=22-Apr-2005 10:21:00 Level=F Type=B
End Job Session Record: File:blk=118:4053 SessId=11 SessTime=1114075126
JobId=7510
   Date=22-Apr-2005 10:23:06 Level=F Type=B Files=1 Bytes=210,739,395 Errors=0
Status=T
...
21-Jul 18:34 bls: End of Volume at file 201 on device "DLTDrive" (/dev/nst0),
Volume "DLT-22Apr05"
21-Jul 18:34 bls: End of all volumes.
Of course, there will be many more records printed, but we have indicated the essential lines of output. From the information on the Begin Job and End Job Session Records, you can reconstruct a bootstrap file such as the one shown above.
- Problem
- How can I find where a file is stored?
- Solution
Normally, it is not necessary, you just use the restore command to restore the most recently saved version (menu option 5), or a version saved before a given date (menu option 8). If you know the JobId of the job in which it was saved, you can use menu option 3 to enter that JobId.
If you would like to know the JobId where a file was saved, select restore menu option 2.
You can also use the query command to find information such as:
*query
Available queries:
     1: List up to 20 places where a File is saved regardless of the
directory
     2: List where the most recent copies of a file are saved
     3: List last 20 Full Backups for a Client
     4: List all backups for a Client after a specified time
     5: List all backups for a Client
     6: List Volume Attributes for a selected Volume
     7: List Volumes used by selected JobId
     8: List Volumes to Restore All Files
     9: List Pool Attributes for a selected Pool
    10: List total files/bytes by Job
    11: List total files/bytes by Volume
    12: List Files for a selected JobId
    13: List Jobs stored on a selected MediaId
    14: List Jobs stored for a given Volume name
    15: List Volumes Bareos thinks are in changer
    16: List Volumes likely to need replacement from age or errors
Choose a query (1-16):
- Problem
- I didn’t backup my database. What do I do now?
- Solution
This is probably the worst of all cases, and you will probably have to re-create your database from scratch and then bscan in all your volumes, which is a very long, painful, and inexact process.
There are basically three steps to take:
- Ensure that your SQL server is running (MySQL or PostgreSQL) and that the Bareos database (normally bareos) exists. See the Prepare Bareos database chapter of the manual.
- Ensure that the Bareos databases are created. This is also described at the above link.
- Start and stop the Bareos Director using the propriate bareos-dir.conf file so that it can create the Client and Storage records which are not stored on the Volumes. Without these records, scanning is unable to connect the Job records to the proper client.
When the above is complete, you can begin bscanning your Volumes. Please see the bscan chapter for more details.