Plugins
The functionality of Bareos can be extended by plugins. Plugins exist for the different daemons (Director, Storage- and File-Daemon).
To use plugins, they must be enabled in the configuration (Plugin Directory and optionally Plugin Names).
If a Plugin Directory is specified, Plugin Names defines which plugins get loaded.
If Plugin Names is not defined, all plugins found in the Plugin Directory are loaded.
The program bpluginfo can be used to retrieve information about a specific plugin.
Python Plugins
A special case of the Bareos Plugins are the Python Plugins. The Python plugins create a connection between the Bareos Plugin API and the Python programming language. With the Python plugins, it is possible to implement Bareos Plugins by writing Python code.
For each daemon there exists a Daemon Python Plugin which is a plugin implementing the C API for Bareos plugins.
This Python plugin can be configured via the usual plugin configuration mechanism which python files to load. The python files then implement the plugin functionality.
Examples for such Python Plugins are the VMware Python Plugin or the oVirt Python Plugin.
Modernization of the Python plugin API
For Bareos Version >= 20, the Bareos Python API was refactored and adapted to support both Python version 2 and Python version 3.
Description of the Bareos Python plugin API for Bareos < 20
In Bareos < 20, the Bareos Python plugin API consists of a Bareos daemon plugin (python-fd, python-sd, python-dir). These plugins are shared objects that are loaded by the corresponding daemon during startup.
![package "Bareos Daemon" {
[Core]
}
package "Daemon Python Plugin (shared library)" {
[Python Extension Module]
[Python Interpreter]
}
package "Python Plugin Scripts" {
[Python Plugin Files]
[Python Constants File]
}
[Core] <-> [Python Interpreter] : Bareos Plugin API
[Python Interpreter] <-> [Python Extension Module] : use
[Python Extension Module] <-> [Python Plugin Files] : Python Plugin API
[Python Plugin Files] -> [Python Constants File] : imports](../_images/plantuml-777db467ba0605b64b240051ca58d058b54f6688.svg)
Bareos Python Plugin Architecture for Bareos < 20
This plugin then creates an internal Python extension module and starts a Python 2 interpreter being able to access the Python module.
The internal Python extension module allows the Python plugin to call functions implemented in Python, and implements callback functions that can be called from the Python code into the core. It also implements the data types that are exchanged via the Bareos plugin interface.
Finally, the Python interpreter loads the Python script configured in the Plugin string of the file set and executes it. This Python script is the Bareos plugin implemented in Python.
As the internal Python extension module is only created inside of the Python plugin, debugging and testing is a challenge.
Definitions of constants required for the Python plugins callbacks into the Bareos core are stored in a Python file called bareos_[fd|sd|dir]_consts, for example bareos_fd_consts.py.
This file contained the required definitions in form of dictionaries, like the following example:
 bRCs = dict(
     bRC_OK=0,
     bRC_Stop=1,
     bRC_Error=2,
     bRC_More=3,
     bRC_Term=4,
     bRC_Seen=5,
     bRC_Core=6,
     bRC_Skip=7,
     bRC_Cancel=8,
 )
To access these values, every Python plugin needs to import this file and access the values via the dictionary like in the following example:
import bareos_fd_consts
... # more code
return bareos_fd_consts.bRCs["bRC_OK"]
The API also always carries a context variable which is part of every function call between the Bareos core and Python, so that every function being called from the core has an context which needs to be given back to every call that goes into the core.
Description of the new Bareos Python plugin API for Bareos >= 20
Since Bareos Version >= 20, two Python plugins exist for each Bareos daemon, where the python- prefix means that the plugin supports Python 2, and the python3- prefix supports Python 3.
The following six plugins now exist:
Python Version |
Python 2 |
Python 3 |
|---|---|---|
filedaemon |
python-fd |
python3-fd |
storage daemon |
python-sd |
python3-sd |
director |
python-dir |
python3-dir |
The functionality of the former internal Python extension module is now implemented as real Python extension module with the name bareos[fd|sd|dir], for example bareosfd. Every Python plugin now has a corresponding Python extension module.
![package "Bareos Daemon" {
[Core]
}
package "Daemon Python Plugin (shared library)" {
[Python Interpreter]
}
package "Python Extension Module (shared object)" {
[Python Extension Module]
}
package "Python Plugin Scripts" {
[Python Plugin Files]
}
[Core] <-> [Python Interpreter] : Bareos Plugin API
[Python Interpreter] <-> [Python Extension Module] : load and use
[Python Extension Module] <-> [Python Plugin Files] : Python Plugin API](../_images/plantuml-5fb47744352a4a45b2129b64b2c72f5811e3b34a.svg)
Bareos Python Plugin Architecture for Bareos >= 20
The Python plugin creates a Python interpreter with either Python 2 or Python 3 which then loads the corresponding Python extension module. Afterwards the interpreter loads the Python script configured in the Plugin fileset setting and executes it.
As the Python extension module for the Python Plugin is now available outside of the Daemon Python Plugin. It is now a real stand-alone Python extension module implemented in C which can be loaded and tested independently.
Definitions required for the Python plugin callbacks into the Bareos core are now compiled into the bareos[fd|sd|dir] Python extension module, and the Python files containing the constant definitions have been removed.
To access these values, every Python plugin imports the corresponding Python extension module and can access the variables immediately.
import bareosfd
...
return bareos_fd.bRC_OK
The dictionaries used before still exist, but every value that was stored in the dictionaries before is also available directly in the bareosfd namespace. To see what is available in the plugin you can import the python extension module and use the dir() function:
import bareosfd
dir(bareosfd)
['AcceptFile', 'AclPacket', 'AddExclude', 'AddInclude', 'AddOptions',
'AddRegex', 'AddWild', 'CF_CORE', 'CF_CREATED', 'CF_ERROR', 'CF_EXTRACT',
'CF_SKIP', 'CheckChanges', 'ClearSeenBitmap', 'DebugMessage', 'FT_BASE',
'FT_DELETED', 'FT_DIRBEGIN', 'FT_DIREND', 'FT_DIRNOCHG', 'FT_FIFO',
'FT_INVALIDDT', 'FT_INVALIDFS', 'FT_ISARCH', 'FT_JUNCTION', 'FT_LNK',
'FT_LNKSAVED', 'FT_NOACCESS', 'FT_NOCHG', 'FT_NOFOLLOW', 'FT_NOFSCHG',
'FT_NOOPEN', 'FT_NORECURSE', 'FT_NOSTAT', 'FT_PLUGIN', 'FT_PLUGIN_CONFIG',
'FT_PLUGIN_CONFIG_FILLED', 'FT_RAW', 'FT_REG', 'FT_REGE', 'FT_REPARSE',
'FT_RESTORE_FIRST', 'FT_SPEC', 'GetInstanceCount', 'GetValue', 'IO_CLOSE',
'IO_OPEN', 'IO_READ', 'IO_SEEK', 'IO_WRITE', 'IoPacket', 'JobMessage',
'L_BASE', 'L_DIFFERENTIAL', 'L_FULL', 'L_INCREMENTAL', 'L_NONE', 'L_SINCE',
'L_VERIFY_CATALOG', 'L_VERIFY_DATA', 'L_VERIFY_DISK_TO_CATALOG',
'L_VERIFY_INIT', 'L_VERIFY_VOLUME_TO_CATALOG', 'L_VIRTUAL_FULL', 'M_ABORT',
'M_ALERT', 'M_DEBUG', 'M_ERROR', 'M_ERROR_TERM', 'M_FATAL', 'M_INFO',
'M_MOUNT', 'M_NOTSAVED', 'M_RESTORED', 'M_SAVED', 'M_SECURITY', 'M_SKIPPED',
'M_TERM', 'M_VOLMGMT', 'M_WARNING', 'NewInclude', 'NewOptions',
'NewPreInclude', 'RegisterEvents', 'RestoreObject', 'RestorePacket',
'SavePacket', 'SetSeenBitmap', 'SetValue', 'StatPacket', 'UnRegisterEvents',
'XattrPacket', '_C_API', '__doc__', '__file__', '__loader__', '__name__',
'__package__', '__spec__', 'bCFs', 'bEventBackupCommand',
'bEventCancelCommand', 'bEventEndBackupJob', 'bEventEndFileSet',
'bEventEndRestoreJob', 'bEventEndVerifyJob', 'bEventEstimateCommand',
'bEventHandleBackupFile', 'bEventJobEnd', 'bEventJobStart', 'bEventLevel',
'bEventNewPluginOptions', 'bEventOptionPlugin', 'bEventPluginCommand',
'bEventRestoreCommand', 'bEventRestoreObject', 'bEventSince',
'bEventStartBackupJob', 'bEventStartRestoreJob', 'bEventStartVerifyJob',
'bEventType', 'bEventVssBackupAddComponents', 'bEventVssBackupComplete',
'bEventVssCloseRestore', 'bEventVssCreateSnapshots',
'bEventVssInitializeForBackup', 'bEventVssInitializeForRestore',
'bEventVssPrepareForBackup', 'bEventVssPrepareSnapshot',
'bEventVssRestoreLoadComponentMetadata',
'bEventVssRestoreSetComponentsSelected', 'bEventVssSetBackupState',
'bFileType', 'bIOPS', 'bJobMessageType', 'bLevels', 'bRC_Cancel',
'bRC_Core', 'bRC_Error', 'bRC_More', 'bRC_OK', 'bRC_Seen', 'bRC_Skip',
'bRC_Stop', 'bRC_Term', 'bRCs', 'bVarAccurate', 'bVarClient',
'bVarDistName', 'bVarExePath', 'bVarFDName', 'bVarFileSeen', 'bVarJobId',
'bVarJobName', 'bVarJobStatus', 'bVarLevel', 'bVarPrefixLinks',
'bVarPrevJobName', 'bVarRegexWhere', 'bVarSinceTime', 'bVarType',
'bVarVersion', 'bVarVssClient', 'bVarWhere', 'bVarWorkingDir', 'bVariable']
During the restructuring of the plugin API it became clear that the context that was always transferred between the core and the Python Plugin and back was unnecessary, so it was completely removed from the API.
The members of the bareosfd.stat_pkt type have been renamed with the st_ prefix to match with the member names of Pythons’ os.stat_result.
Porting existing Python plugins
Porting existing Python plugin from Version 19 to 20 requires is not very hard and requires the following steps:
- Remove “context” everywhere
The context being transferred between all Python API calls was unnecessary and was removed, so it needs to be removed in all Python callers and callbacks.
- Switch to the constants being defined in the bareos[fd|sd|dir] Python plugin.
Import bareos[fd|sd|dir] instead of bareos_[fd|sd|dir]_consts.
Add the st_ prefix to all members of stat_pkt type.
- Adapt the code to run on Python 2 and Python 3
It is important to make sure the code works both for Python 2 and 3. While the c++ code and the Python api have been reorganized, the Python plugin code itself is the same being run with Python 2 or 3. Existing plugins have been ported and the current Python 2 version support already a lot of things required by Python 3. For more details see Python 3 Porting Guide, strings chapter:
Switching to Python 3
- Switching to use the Python 3 plugin, the following needs to be changed:
Set Plugin Names = “python3” to make sure the Python3 plugin is loaded.
Adapt the Plugin setting in the fileset to use Python3: Plugin = “python3:module_path …
Warning
It is not possible to load the python2 and python3 plugins at the same time.
Recovering old backups
When doing backups, the plugin parameter string is stored into the backup stream. During restore, this string is used to determine the plugin that will handle this data.
To be able to restore backups created with Python plugins using the python3-fd plugin that were created using the python-fd plugin, the code determining the plugin that will handle the data also matches for the basename of the current available plugins without the last character.
So backups created with the python plugin (which uses Python 2) can be restored with the python3 plugin (which uses Python 3).
Warning
It is not possible to use the python plugin to restore backups created with the python3 plugin. Once switched, you need to stay on python3.
File Daemon Plugins
File Daemon plugins are configured by the Plugin directive of a File Set.
Warning
Currently the plugin command is being stored as part of the backup. The restore command in your directive should be flexible enough if things might change in future, otherwise you could run into trouble.
bpipe Plugin
The bpipe plugin is a generic pipe program, that simply transmits the data from a specified program to Bareos for backup, and from Bareos to a specified program for restore. The purpose of the plugin is to provide an interface to any system program for backup and restore. That allows you, for example, to do database backups without a local dump. By using different command lines to bpipe, you can backup any kind of data (ASCII or binary) depending on the program called.
On Linux, the Bareos bpipe plugin is part of the bareos-filedaemon package and is therefore installed on any system running the filedaemon.
The bpipe plugin is so simple and flexible, you may call it the “Swiss Army Knife” of the current existing plugins for Bareos.
The bpipe plugin is specified in the Include section of your Job’s FileSet resource.
The syntax and semantics of the Plugin directive require the first part of the string up to the colon to be the name of the plugin. Everything after the first colon is ignored by the File daemon but is passed to the plugin. Thus the plugin writer may define the meaning of the rest of the string as he wishes. The full syntax of the plugin directive as interpreted by the bpipe plugin is:
Since Bareos Version >= 20 the plugin string can be spread over multiple lines using quotes as shown above.
- plugin
is the name of the plugin with the trailing -fd.so stripped off, so in this case, we would put bpipe in the field.
- filepath
specifies the namespace, which for bpipe is the pseudo path and filename under which the backup will be saved. This pseudo path and filename will be seen by the user in the restore file tree. For example, if the value is /MySQL/mydump.sql, the data backed up by the plugin will be put under that “pseudo” path and filename. You must be careful to choose a naming convention that is unique to avoid a conflict with a path and filename that actually exists on your system.
- readprogram
for the bpipe plugin specifies the “reader” program that is called by the plugin during backup to read the data. bpipe will call this program by doing a popen on it.
- writeprogram
for the bpipe plugin specifies the “writer” program that is called by the plugin during restore to write the data back to the filesystem. To simply create a file, containing the data of the backup, following command can by used on a Unix system:
writer=sh -c 'cat >/var/tmp/bpipe.data'
Please note that the two items above describing the “reader” and “writer”, these programs are “executed” by Bareos, which means there is no shell interpretation of any command line arguments you might use. If you want to use shell characters (redirection of input or output, …), then we recommend that you put your command or commands in a shell script and execute the script. In addition if you backup a file with reader program, when running the writer program during the restore, Bareos will not automatically create the path to the file. Either the path must exist, or you must explicitly do so with your command or in a shell script.
See the examples about Backup of a PostgreSQL Database and Backup of a MySQL Database.
MySQL Plugin
See the chapters Percona XtraBackup Plugin and Backup of MySQL Databases using the Python MySQL plugin.
MSSQL Plugin
See chapter Backup of MSSQL Databases with Bareos Plugin.
LDAP Plugin
Deprecated since version 20.0.0.
This plugin is intended to backup (and restore) the contents of a LDAP server. It uses normal LDAP operation for this. The package bareos-filedaemon-ldap-python-plugin (Version >= 15.2.0) contains an example configuration file, that must be adapted to your environment.
Cephfs Plugin
Opposite to the Rados Backend that is used to store data on a CEPH Object Store, this plugin is intended to backup a CEPH Object Store via the Cephfs interface to other media. The package bareos-filedaemon-ceph-plugin (Version >= 15.2.0) contains an example configuration file, that must be adapted to your environment.
Rados Plugin
Deprecated since version 20.0.0.
Opposite to the Rados Backend that is used to store data on a CEPH Object Store, this plugin is intended to backup a CEPH Object Store via the Rados interface to other media. The package bareos-filedaemon-ceph-plugin (Version >= 15.2.0) contains an example configuration file, that must be adapted to your environment.
GlusterFS Plugin
Opposite to the GFAPI Backend that is used to store data on a Gluster system, this plugin is intended to backup data from a Gluster system to other media. The package bareos-filedaemon-glusterfs-plugin (Version >= 15.2.0) contains an example configuration file, that must be adapted to your environment.
python-fd Plugin
The python-fd plugin behaves similar to the python-dir Plugin. Base plugins and an example get installed via the package bareos-filedaemon-python-plugin. Configuration is done in the FileSet Resource on the director.
We basically distinguish between command-plugin and option-plugins.
Command Plugins
Command plugins are used to replace or extend the FileSet definition in the File Section. If you have a command-plugin, you can use it like in this example:
This example uses the MySQL plugin to backup MySQL dumps in addition to /etc.
Option Plugins
Option plugins are activated in the Options resource of a FileSet definition.
Example:
This plugin bareos-fd-file-interact from https://github.com/bareos/bareos-contrib/tree/master/fd-plugins/options-plugin-sample has a method that is called before and after each file that goes into the backup, it can be used as a template for whatever plugin wants to interact with files before or after backup.
VMware Plugin
The VMware Plugin can be used for agentless backups of virtual machines running on VMware vSphere. It makes use of CBT (Changed Block Tracking) to do space efficient full and incremental backups, see below for mandatory requirements.
It is included in Bareos since Version >= 15.2.0.
Status
The Plugin can do full, differential and incremental backup and restore of VM disks.
Current limitations amongst others are:
Limitation - VMware Plugin: Normal VM disks can not be excluded from the backup.
It is not yet possible to exclude normal (dependent) VM disks from backups. However, independent disks are excluded implicitly because they are not affected by snapshots which are required for CBT based backup.
Limitation - VMware Plugin: VM configuration is not backed up.
The VM configuration is not backed up, so that it is not yet possible to recreate a completely deleted VM.
Limitation - VMware Plugin: Virtual Disks have to be smaller than 2TB for restore to local VMDK.
Virtual Disks have to be smaller than 2 TB for being able to restore to local VMDK files, see Issue #670.
Limitation - VMware Plugin: Restore can only be done to the same VM or to local VMDK files.
Until Bareos Version 15.2.2, the restore has only be possible to the same existing VM with existing virtual disks. Since Version >= 15.2.3 %**bareos-vadp-dumper** Version >= 15.2.2-15 and %**bareos-vmware-plugin** Version >= 15.2.2-27 it is also possible to restore to local VMDK files, see below for more details.
Requirements
As the Plugin is based on the VMware vSphere Storage APIs for Data Protection, which requires at least a VMware vSphere Essentials License. It is tested against VMware vSphere Storage APIs for Data Protection of VMware 7.0.1. It does not work with standalone unlicensed VMware ESXi™.
Since Bareos Version >= 20.0.8 the plugin is using the Virtual Disk Development Kit (VDDK) 8.0.0, as of the VDDK 8.0 release notes, it should be compatible with vSphere 8 and the next major release (except new features) and backward compatible with vSphere 6.7 and 7, see VDDK release notes at https://code.vmware.com/web/sdk/8.0/vddk for details.
This plugin requires the pyVmomi module. Since Bareos Version >= 20.0.0 the package bareos-vmware-plugin no longer includes a dependency on a pyVmomi package, because some Linux distributions don’t provide current versions. Consequently, pyVmomi must be either installed by using pip install pyvmomi or by manually installing a distribution provided pyVmomi package.
Installation
Install the package bareos-vmware-plugin including its requirements by using an appropriate package management tool (eg. yum, zypper, apt)
Configuration
First add a user account in vCenter that has full privileges by assigning the account to an administrator role or by adding the account to a group that is assigned to an administrator role. While any user account with full privileges could be used, it is better practice to create a separate user account, so that the actions by this account logged in vSphere are clearly distinguishable. In the future a more detailed set of required role privileges may be defined.
When using the vCenter appliance with embedded SSO, a user account usually has the structure <username>@vsphere.local, it may be different when using Active Directory as SSO in vCenter. For the examples here, we will use bakadm@vsphere.local with the password Bak.Adm-1234.
For more details regarding users and permissions in vSphere see
Make sure to add or enable the following settings in your Bareos File Daemon configuration:
Note: Depending on Platform, the Plugin Directory may also be /usr/lib64/bareos/plugins
To define the backup of a VM in Bareos, a job definition and a fileset resource must be added to the Bareos director configuration. In vCenter, VMs are usually organized in datacenters and folders. The following example shows how to configure the backup of the VM named websrv1 in the datacenter mydc1 folder webservers on the vCenter server vcenter.example.org:
For VMs defined in the root-folder, folder=/ must be specified in the Plugin definition.
Since Bareos Version >= 17.2.4 the module_path is without vmware_plugin directory. On upgrades you either adapt your configuration from
to
or install the bareos-vmware-plugin-compat package which includes compatibility symbolic links.
Since Version >= 17.2.4: as the Plugin is using the Virtual Disk Development Kit (VDDK) 6.5, it is required to pass the thumbprint of the vCenter SSL Certificate, which is the SHA1 checksum of the SSL Certificate. The thumbprint can be retrieved like this:
echo -n | openssl s_client -connect vcenter.example.org:443 2>/dev/null | openssl x509 -noout -fingerprint -sha1 | tr -d ":"
The result would look like this:
SHA1 Fingerprint=AABBCCDDEEFF11223344556677889900AABBCCDD
For additional security, there is a now plugin option vcthumbprint, that can optionally be added. It must be given without colons like in the following example:
For ease of use (but less secure) when the vcthumbprint is not given, the plugin will retrieve the thumbprint.
Also since Version >= 17.2.4 another optional plugin option has been added that can be used for trying to force a given transport method. Normally, when no transport method is given, VDDK will negotiate available transport methods and select the best one. For a description of transport methods, see
https://code.vmware.com/doc/preview?id=4076#/doc/vddkDataStruct.5.5.html
When the plugin runs in a VMware virtual machine which has access to datastore where the virtual disks to be backed up reside, VDDK will use the hotadd transport method. On a physical server without SAN access, it will use the NBD transport method, hotadd transport is not available in this case.
To try forcing a given transport method, the plugin option transport can be used, for example
Note that the backup will fail when specifying a transport method that is not available.
Since Version >= 17.2.8 it is possible to use non-ascii characters and blanks in the configuration for folder and vmname. Also virtual disk file names or paths containing non-ascii characters are handled correctly now. For backing up VMs that are contained in vApps, it is now possible to use the vApp name like a folder component. For example, if we have the vApp named
Test vApp in the folder /Test/Test Folder and the vApp contains the two VMs Test VM 01 and Test VM 02, then the configuration of the filesets should look like this:
However, it is important to know that it is not possible to use non-ascii characters as an argument for the Name of a job or fileset resource.
Before this, it was only possible specify VMs contained in vApps by using the instance UUID with the uuid instead of folder and vmname like this:
Note that it must be the so called vSphere instance UUID, not the BIOS UUID which is shown inside a VM when using for example dmidecode. The vmware_cbt_tool.py utility was adapted accordingly (see below for details).
Since Version >= 20 it is optionally possible to use a configuration file on the system running the Bareos File Daemon. This can be useful to specify common plugin options instead of having to repeat them in every Fileset. Options which are specifed in the config file will override options from the Fileset, if the same option is given there, too. A warning will be issued in that case. Use the plugin option config_file to specify the config file name as in the following example:
And the config file as follows:
Note
Do not use quotes in the above config file, it is processed by the Python ConfigParser module and the quotes would not be stripped from the string.
Since Version >= 20 To allow backing up VMs which do not support quiesced snapshots, it is now possible to use the plugin option quiesce. By default quiescing when not explicitly using this option, quiescing is enabled to create backups that are as consistent as possible. When setting quiesce=no it is more likely to backup an inconsistent state. In this case, the backup job log will contain an appropriate warning and the the job termination will be Backup OK – with warnings.
Backup
Before running the first backup, CBT (Changed Block Tracking) must be enabled for the VMs to be backed up.
As of http://kb.vmware.com/kb/2075984 manually enabling CBT is currently not working properly. The API however works properly. To enable CBT use the Script vmware_cbt_tool.py, it is packaged in the bareos-vmware-plugin package:
user@host:~$ vmware_cbt_tool.py --help
usage: vmware_cbt_tool.py [-h] -s HOST [-o PORT] -u USER [-p PASSWORD] -d
                          DATACENTER [-f FOLDER] [-v VMNAME]
                          [--vm-uuid VM_UUID] [--enablecbt] [--disablecbt]
                          [--resetcbt] [--info] [--listall]

Process args for enabling/disabling/resetting CBT

optional arguments:
  -h, --help            show this help message and exit
  -s HOST, --host HOST  Remote host to connect to
  -o PORT, --port PORT  Port to connect on
  -u USER, --user USER  User name to use when connecting to host
  -p PASSWORD, --password PASSWORD
                        Password to use when connecting to host
  -d DATACENTER, --datacenter DATACENTER
                        DataCenter Name
  -f FOLDER, --folder FOLDER
                        Folder Name (must start with /, use / for root folder
  -v VMNAME, --vmname VMNAME
                        Names of the Virtual Machines
  --vm-uuid VM_UUID     Instance UUIDs of the Virtual Machines
  --enablecbt           Enable CBT
  --disablecbt          Disable CBT
  --resetcbt            Reset CBT (disable, then enable)
  --info                Show information (CBT supported and enabled or
                        disabled)
  --listall             List all VMs in the given datacenter with UUID and
                        containing folder
Note: the options --vm-uuid and --listall have been added in version Version >= 17.2.8, the tool is also able now to process non-ascii character arguments for the --folder and --vmname arguments and vApp names can be used like folder name components. With --listall all VMs in the given datacenter are reported in a tabular output including instance UUID and containing Folder/vApp name.
For the above configuration example, the command to enable CBT would be
user@host:~$ vmware_cbt_tool.py -s vcenter.example.org -u bakadm@vsphere.local -p Bak.Adm-1234 -d mydc1 -f /webservers -v websrv1 --enablecbt
Note: CBT does not work if the virtual hardware version is 6 or earlier.
After enabling CBT, Backup Jobs can be run or scheduled as usual, for example in bconsole:
run job=vm-websrv1 level=Full
Restore
For restore, the VM must be powered off and no snapshot must exist. In bconsole use the restore menu 5, select the correct FileSet and enter mark *, then done. After restore has finished, the VM can be powered on.
Restore to local VMDK File
Since Version >= 15.2.3 it is possible to restore to local VMDK files. That means, instead of directly restoring a disk that belongs to the VM, the restore creates VMDK disk image files on the filesystem of the system that runs the Bareos File Daemon. As the VM that the backup was taken from is not affected by this, it can remain switched on while restoring to local VMDK. Such a restored VMDK file can then be uploaded to a VMware vSphere datastore or accessed by tools like guestfish to extract single files.
For restoring to local VMDK, the plugin option localvmdk=yes must be passed. The following example shows how to perform such a restore using bconsole:
*<input>restore</input>
Automatically selected Catalog: MyCatalog
Using Catalog "MyCatalog"

First you select one or more JobIds that contain files
to be restored. You will be presented several methods
of specifying the JobIds. Then you will be allowed to
select which files from those JobIds are to be restored.

To select the JobIds, you have the following choices:
     1: List last 20 Jobs run
     ...
     5: Select the most recent backup for a client
     ...
    13: Cancel
Select item:  (1-13): <input>5</input>
Automatically selected Client: vmw5-bareos-centos6-64-devel-fd
The defined FileSet resources are:
     1: Catalog
     ...
     5: PyTestSetVmware-test02
     6: PyTestSetVmware-test03
     ...
Select FileSet resource (1-10): <input>5</input>
+-------+-------+----------+---------------+---------------------+------------------+
| jobid | level | jobfiles | jobbytes      | starttime           | volumename       |
+-------+-------+----------+---------------+---------------------+------------------+
|   625 | F     |        4 | 4,733,002,754 | 2016-02-18 10:32:03 | Full-0067        |
...
You have selected the following JobIds: 625,626,631,632,635

Building directory tree for JobId(s) 625,626,631,632,635 ...
10 files inserted into the tree.

You are now entering file selection mode where you add (mark) and
remove (unmark) files to be restored. No files are initially added, unless
you used the "all" keyword on the command line.
Enter "done" to leave this mode.

cwd is: /
$ <input>mark *</input>
10 files marked.
$ <input>done</input>
Bootstrap records written to /var/lib/bareos/vmw5-bareos-centos6-64-devel-dir.restore.1.bsr

The job will require the following
   Volume(s)                 Storage(s)                SD Device(s)
===========================================================================

    Full-0001                 File                      FileStorage
    ...
    Incremental-0078          File                      FileStorage

Volumes marked with "*" are online.

10 files selected to be restored.

Using Catalog "MyCatalog"
Run Restore job
JobName:         RestoreFiles
Bootstrap:       /var/lib/bareos/vmw5-bareos-centos6-64-devel-dir.restore.1.bsr
Where:           /tmp/bareos-restores
Replace:         Always
FileSet:         Linux All
Backup Client:   vmw5-bareos-centos6-64-devel-fd
Restore Client:  vmw5-bareos-centos6-64-devel-fd
Format:          Native
Storage:         File
When:            2016-02-25 15:06:48
Catalog:         MyCatalog
Priority:        10
Plugin Options:  *None*
OK to run? (yes/mod/no): <input>mod</input>
Parameters to modify:
     1: Level
     ...
    14: Plugin Options
Select parameter to modify (1-14): <input>14</input>
Please enter Plugin Options string: <input>python:localvmdk=yes</input>
Run Restore job
JobName:         RestoreFiles
Bootstrap:       /var/lib/bareos/vmw5-bareos-centos6-64-devel-dir.restore.1.bsr
Where:           /tmp/bareos-restores
Replace:         Always
FileSet:         Linux All
Backup Client:   vmw5-bareos-centos6-64-devel-fd
Restore Client:  vmw5-bareos-centos6-64-devel-fd
Format:          Native
Storage:         File
When:            2016-02-25 15:06:48
Catalog:         MyCatalog
Priority:        10
Plugin Options:  python: module_path=/usr/lib64/bareos/plugins:module_name=bareos-fd-vmware: dc=dass5:folder=/: vmname=stephand-test02: vcserver=virtualcenter5.dass-it:vcuser=bakadm@vsphere.local: vcpass=Bak.Adm-1234: localvmdk=yes
OK to run? (yes/mod/no): <input>yes</input>
Job queued. JobId=639
Note: Since Bareos Version >= 15.2.3 it is sufficient to add Python plugin options, e.g. by
python:localvmdk=yes
Before, all Python plugin must be repeated and the additional be added, like:
After the restore process has finished, the restored VMDK files can be found under path{/tmp/bareos-restores/}:
# <input>ls -laR /tmp/bareos-restores</input>
/tmp/bareos-restores:
total 28
drwxr-x--x.  3 root root  4096 Feb 25 15:47 .
drwxrwxrwt. 17 root root 20480 Feb 25 15:44 ..
drwxr-xr-x.  2 root root  4096 Feb 25 15:19 [ESX5-PS100] stephand-test02

/tmp/bareos-restores/[ESX5-PS100] stephand-test02:
total 7898292
drwxr-xr-x. 2 root root       4096 Feb 25 15:19 .
drwxr-x--x. 3 root root       4096 Feb 25 15:47 ..
-rw-------. 1 root root 2075197440 Feb 25 15:19 stephand-test02_1.vmdk
-rw-------. 1 root root 6012731392 Feb 25 15:19 stephand-test02.vmdk
Debugging in case of problems
If the backup or restore fails, it is possible to get verbose information by adding the plugin option vadp_dumper_verbose=yes
    Plugin = "python"
             ":module_path=/usr/lib64/bareos/plugins"
             ":module_name=bareos-fd-vmware"
             ":dc=mydc1:folder=/webservers"
             ":vmname=websrv1"
             ":vcserver=vcenter.example.org"
             ":vcuser=bakadm@vsphere.local"
             ":vcpass=Bak.Adm-1234"
             ":vadp_dumper_verbose=yes"
oVirt Plugin
The oVirt Plugin can be used for agentless backups of virtual machines running on oVirt or Red Hat Virtualization (RHV). It was tested with oVirt/RHV 4.4. There are currently no known technical differences between RHV and oVirt (which is RHV’s upstream project) that are relevant for this plugin, so both names are equivalent in this documentation if not explicitly mentioned.
For backing up a VM, the plugin performs the following steps:
Retrieve the VM configuration data from the oVirt API as OVF XML data
Take a snapshot of the VM
Retrieve the VM disk image data of the snapshot via oVirt Image I/O
Remove the snapshot
When using include/exclude options, the snapshot will only contain the resulting disks.
It is included in Bareos since Version >= 19.
Status of oVirt Plugin
The Plugin can currently only take full backups of VM disks.
In oVirt 4.4 the incremental backup feature was added, in RHV 4.4 this is still declared as a technology preview feature. The Bareos oVirt plugin does not yet support this new feature.
When performing restores, the plugin can do one of the following:
Write local disk image files
Create a new VM with new disks
Overwrite existing disks of an existing VM
Additionally it is possible to
Skip disks by alias names using include/exclude
Restoring the VM only without any disks is possible by
Selecting to restore only the .ovf file
Excluding all disks by alias
Currently, the access to disk images is implemented only via the oVirt Image I/O Proxy component of the engine server.
Since Version >= 20 the plugin works with both Python version 2 or 3 and it was adapted to the modernized Bareos Python plugin API.
Requirements of oVirt Plugin
The plugin is currently only available for Red Hat Enterprise Linux and CentOS 7 and 8. It requires the
Python oVirt Engine SDK version 4, Red Hat Subscriptions customers can find the package
python-ovirt-engine-sdk4 in the rh-common repo for RHEL 7, which may not be enabled by default.
For RHEL 8 the package python3-ovirt-engine-sdk4 can be found in the rhv-4-tools-for-rhel-8-x86_64-rpms
repo.
The oVirt project provides the package at https://resources.ovirt.org/pub/ovirt-4.3/rpm/el7/x86_64/
or https://resources.ovirt.org/pub/ovirt-4.4/rpm/el8/x86_64/.
As mentioned above, since Version >= 20 the plugin works with Python version 2 or 3, however, it is recommended to use Python 3 because Python 2 has reached it’s end of life. To allow the user more flexibility for the installation of the Python oVirt Engine SDK, the dependency on the python-ovirt-engine-sdk4 has been removed in the Bareos package. Instead, the plugin code now creates an appropriate job error messages when the SDK is not installed. The user can now choose to either install the python3-ovirt-engine-sdk4 package from the oVirt project or Red Hat repo, or install the SDK by using
pip3 install ovirt-engine-sdk-python
Use pip or pip2 for the Python 2 version.
The system running the Bareos File Daemon with this plugin must have network access to the oVirt/RHV engine server on the TCP ports 443 (https for API access) and 54323 (for Image I/O Proxy access).
The QEMU Guest Agent (QEMU GA) should be installed inside VMs to optimize the consistency of snapshots by filesystem flushing and quiescing. This also allows custom freeze/thaw hook scripts in Linux VMs to ensure application level consistency of snapshots. On Windows the QEMU GA provides VSS support thus live snapshots attempt to quiesce whenever possible.
Installation of oVirt Plugin
The installation is done by installing the package bareos-filedaemon-ovirt-python-plugin:
yum install bareos-filedaemon-ovirt-python-plugin
Configuration of oVirt Plugin
As the Plugin needs access to the oVirt API, an account with appropriate privileges must be used. The default admin@internal user works, as it has all privileges. Using an account with less privileges should be possible, the plugin needs to be able to do the following:
Read VM metadata
Read, create and write disk images via Image I/O Proxy
Create VMs
The exact required oVirt roles are beyond the scope of this document.
To verify SSL certificates, the plugin must know the CA certificate of the oVirt environment, it can be downloaded from the oVirt/RHV engine start page manually, or by using the following command:
curl -k -o /etc/bareos/ovirt-ca.cert https://engine.example.com/ovirt-engine/services/pki-resource?resource=ca-certificate&format=X509-PEM-CA
For each VM to be backed up, a job and a fileset must be configured. For example to backup the VM testvm1, configure the fileset as follows:
Note
The Plugin options string can currently not be split over multiple lines in the configuration file.
And the job as follows:
Optionally, it is possible to use a configuration file on the system running the Bareos File Daemon for storing the credentials instead of using the plugin options username and password. Use the plugin option config_file to specify the config file name as in the following example:
And the config file as follows:
Note
Do not use quotes in the above config file, it is processed by the Python ConfigParser module and the quotes would not be stripped from the string.
Currently the config file can only be used for credentials. If username and password are also present in the plugin options, the credentials from the config file will override them. In this case, the job log will contain a warning.
Mandatory Plugin Options:
- module_path
Path to the plugin, when installed from Bareos packages, this is always
/usr/lib64/bareos/plugins- module_name
Always
bareos-fd-ovirt- ca
Path to the oVirt/RHV SSL CA File, the CA File must be downloaded as described above
- server
The FQDN of the oVirt/RHV engine server
- username
The username of an account which has appropriate privileges
- password
The password for the user that is configured with username
- vm_name
The name of the VM to be backed up
- storage_domain
The target storage domain name (only for restore)
Optional Plugin Options:
- uuid
Instead of specifying the VM to be backed up by name (using option vm_name), the VM can be specified by its uuid.
- include_disk_aliases
Comma separated list of disk alias names to be included only. If not specified, all disks that are attached to the VM are included. Can be used on backup and restore.
- exclude_disk_aliases
Comma separated list of disk alias names to be excluded, if not specified, no disk will be excluded. Using
exclude_disk_aliases=*would exclude all disks. Can be used on backup and restore. Note that the include_disk_aliases options is applied first, then exclude_disk_aliases, so using both usually makes no sense. Also note that disk alias names are not unique, so if two disks of a VM have the same alias name, they will be excluded both. Excluded disks will be already excluded from the snapshot. On local restore, both include_disk_aliases and exclude_disk_aliases are ignored and all disk that were backed up will be restored.- overwrite
When restoring disks of an existing VM, the option overwrite=yes must be explicitly passed to force overwriting. To prevent from accidentally overwriting an existing VM, the plugin will return an error message if this option is not passed.
- cluster_name
When restoring, the target cluster name can be specified. Otherwise the default cluster will be used.
- vm_template
The VM template to be used when restoring to a new VM. If not specified, the default Blank template will be used.
- vm_type
When not using this option, the VM type Server will be used when restoring to a new VM. The VM Type can be set to Desktop or High Performance optionally by using vm_type=desktop or vm_type=high_performance.
- vm_memory
When not using this option, the amount of VM memory configured when restoring to a new VM will be taken from the VM metadata that have been saved on backup. Optionally, the amount of memory for the new VM can be specified in Megabytes here, for example by using vm_memory=4 would create the new vm with 4 MB or RAM.
- vm_cpu
When not using this option, the number of virtual CPU cores/sockets/threads configured when restoring to a new VM will be taken from the VM metadata that have been saved on backup. Optionally, the amount of a cores/sockets/threads can be specified as a comma separated list vm_cpu=<cores>,<sockets>,<threads>.
- ovirt_sdk_debug_log
Only useful for debugging purposes, enables writing oVirt SDK debug log to the specified file, for example by adding ovirt_sdk_debug_log=/var/log/bareos/ovirt-sdk-debug.log.
Backup with oVirt Plugin
To manually run a backup, use the following command in Bareos Console:
*run job=testvm1_job level=Full
Using Catalog "MyCatalog"
Run Backup job
JobName:  testvm1_job
Level:    Full
Client:   bareos-fd
Format:   Native
FileSet:  testvm1_fileset
Pool:     Full (From Job FullPool override)
Storage:  File (From Job resource)
When:     2019-12-16 17:41:13
Priority: 10
OK to run? (yes/mod/no): yes
Job queued. JobId=1
Note
As the oVirt/RHV API does not yet allow Incremental backups, the plugin will only allow to run full level backups to prevent from using the Incremental pool accidentally. Please make sure to configure a schedule that always runs full level backups for jobs using this plugin.
Restore with oVirt Plugin
An example restore dialogue could look like this:
*restore

First you select one or more JobIds that contain files
to be restored. You will be presented several methods
of specifying the JobIds. Then you will be allowed to
select which files from those JobIds are to be restored.

To select the JobIds, you have the following choices:
     1: List last 20 Jobs run
     2: List Jobs where a given File is saved
     3: Enter list of comma separated JobIds to select
     4: Enter SQL list command
     5: Select the most recent backup for a client
     6: Select backup for a client before a specified time
     7: Enter a list of files to restore
     8: Enter a list of files to restore before a specified time
     9: Find the JobIds of the most recent backup for a client
    10: Find the JobIds for a backup for a client before a specified time
    11: Enter a list of directories to restore for found JobIds
    12: Select full restore to a specified Job date
    13: Cancel
Select item:  (1-13): 5
Defined Clients:
     1: bareos1-fd
     2: bareos2-fd
     3: bareos3-fd
     4: bareos4-fd
     5: bareos-fd
Select the Client (1-5): 5
Automatically selected FileSet: testvm1_fileset
+-------+-------+----------+-------------+---------------------+------------+
| jobid | level | jobfiles | jobbytes    | starttime           | volumename |
+-------+-------+----------+-------------+---------------------+------------+
|     1 | F     |        9 | 564,999,361 | 2019-12-16 17:41:26 | Full-0001  |
+-------+-------+----------+-------------+---------------------+------------+
You have selected the following JobId: 1

Building directory tree for JobId(s) 1 ...
5 files inserted into the tree.

You are now entering file selection mode where you add (mark) and
remove (unmark) files to be restored. No files are initially added, unless
you used the "all" keyword on the command line.
Enter "done" to leave this mode.

cwd is: /
$ mark *
5 files marked.
$ done
Bootstrap records written to /var/lib/bareos/bareos-dir.restore.3.bsr

The job will require the following
   Volume(s)                 Storage(s)                SD Device(s)
===========================================================================

    Full-0001                 File                      FileStorage

Volumes marked with "*" are online.


5 files selected to be restored.

Run Restore job
JobName:         RestoreFiles
Bootstrap:       /var/lib/bareos/bareos-dir.restore.3.bsr
Where:           /tmp/bareos-restores
Replace:         Always
FileSet:         LinuxAll
Backup Client:   bareos-fd
Restore Client:  bareos-fd
Format:          Native
Storage:         File
When:            2019-12-16 20:58:31
Catalog:         MyCatalog
Priority:        10
Plugin Options:  *None*
OK to run? (yes/mod/no): mod
Parameters to modify:
     1: Level
     2: Storage
     3: Job
     4: FileSet
     5: Restore Client
     6: Backup Format
     7: When
     8: Priority
     9: Bootstrap
    10: Where
    11: File Relocation
    12: Replace
    13: JobId
    14: Plugin Options
Select parameter to modify (1-14): 14
Please enter Plugin Options string: python:storage_domain=hosted_storage:vm_name=testvm1restore
Run Restore job
JobName:         RestoreFiles
Bootstrap:       /var/lib/bareos/bareos-dir.restore.3.bsr
Where:           /tmp/bareos-restores
Replace:         Always
FileSet:         LinuxAll
Backup Client:   bareos-fd
Restore Client:  bareos-fd
Format:          Native
Storage:         File
When:            2019-12-16 20:58:31
Catalog:         MyCatalog
Priority:        10
Plugin Options:  python:storage_domain=hosted_storage:vm_name=testvm1restore
OK to run? (yes/mod/no): yes
Job queued. JobId=2
By using the above Plugin Options, the new VM testvm1restore is created and the disks are created in the storage domain hosted_storage with the same cpu and memory parameters as the backed up VM.
When omitting the vm_name Parameter, the VM name will be taken from the backed up metadata and the plugin will restore to the same VM if it still exists.
When restoring disks of an existing VM, the option overwrite=yes must be explictly passed to force overwriting. To prevent from accidentally overwriting an existing VM, the plugin will return an error message if this option is not passed.
Restore to local disk image
Instead of restoring to an existing or new VM, it is possible to restore the disk image as image files on the system running the Bareos FD. To perform such a restore, the following Plugin Option must be entered:
*restore

First you select one or more JobIds that contain files
to be restored. You will be presented several methods
...
Plugin Options:  python:local=yes
OK to run? (yes/mod/no): yes
Job queued. JobId=2
Anything else from the restore dialogue is the same.
This will create disk image files that could be examined for example by using the guestfish tool (see http://libguestfs.org/guestfish.1.html). This tool can also be used to extract single files from the disk image.
Apache Libcloud Plugin
The Libcloud plugin can be used to backup objects from cloud storages via the Simple Storage Service (S3) protocol. The plugin code is based on the work of Alexandre Bruyelles.
Status of Libcloud Plugin
The status of the Libcloud plugin is experimental. It can automatically recurse nested Buckets and backup all included Objects on a S3 storage. However, restore of objects cannot be done directly back to the storage. A restore will write these objects as files on a filesystem.
Requirements of Libcloud Plugin
To use the Apache Libcloud backend you need to have the Libcloud module available for Python 2.
The plugin needs several options to run properly, the plugin options in the fileset resource and an additional configuration file. Both is described below.
Installation of Libcloud Plugin
The installation is done by installing the package bareos-filedaemon-libcloud-python-plugin.
Configuration of Libcloud Plugin
Note
Replace ‘lib64’ by ‘lib’ where necessary
Note
The Plugin options string can currently not be split over multiple lines in the configuration file.
The plugin options, separated by a colon:
- module_path
Path to the bareos modules
- module_name=bareos-fd-libcloud
This is the name of the plugin module
- config_file
The plugin needs additional parameters, this is the path to the config file (see below)
- buckets_include
Comma-separated list of buckets to include in backup
- buckets_exclude
Comma-separated list of buckets to exclude from backup
And the job as follows:
And the plugin config file as follows:
Note
Do not use quotes in the above config file, it is processed by the Python ConfigParser module and the quotes would not be stripped from the string.
Mandatory Plugin Options:
These options in the config file are mandatory:
- hostname
The hostname/ip address of the storage backend server
- port
The portnumber for the backend server
- tls
Use Transport encryption, if supported by the backend
- provider
The provider string, currently only ‘S3’
- username
The username to use for backups
- password
The password for the backup user
- nb_worker
The number of worker processes who can preload data from objects simultaneously before they are given to the plugin process that does the backup
- queue_size
The maximum size in numbers of objects of the internal communication queue between the processes
- prefetch_size
The maximum object size in bytes that should be preloaded from the workers; objects larger than this size are loaded by the plugin process itself
- temporary_download_directory
The local path where the worker processes put their temporarily downloaded files to; the filedaemon process needs read and write access to this path
Optional Plugin Options:
This option in the config file is optional:
- fail_on_download_error
When this option is enabled, any error during a file download will fail the backup job. By default a warning will be issued and the next file will be backed up.
- job_message_after_each_number_of_objects
When running a backup, put a jobmessage after each count of “job_message_after_number_of_objects” to the joblog or no message if parameter equals 0; default is 100.
Percona XtraBackup Plugin
This plugin uses Perconas XtraBackup tool, to make full and incremental backups of MySQL/MariaDB databases.
The key features of XtraBackup are:
Incremental backups
Backups that complete quickly and reliably
Uninterrupted transaction processing during backups
Savings on disk space and network bandwidth
Higher uptime due to faster restore time
Incremental backups only work for INNODB tables, when using MYISAM, only full backups can be created.
Prerequisites of percona XtraBackup Plugin
Install the XtraBackup tool from Percona. Documentation and packages are available here: https://www.percona.com/software/mysql-database/percona-XtraBackup. The plugin was successfully tested with XtraBackup versions 2.3.5 and 2.4.4.
For authentication the .mycnf file of the user running the Bareos File Daemon is used. Before proceeding, make sure that XtraBackup can connect to the database and create backups.
Installation of percona XtraBackup Plugin
Make sure you have met the prerequisites, after that install the package bareos-filedaemon-percona_XtraBackup-python-plugin.
Configuration of percona XtraBackup Plugin
Activate your plugin directory in the Bareos File Daemon configuration. See File Daemon Plugins for more about plugins in general.
Now include the plugin as command-plugin in the Fileset resource:
If used this way, the plugin will call XtraBackup to create a backup of all databases in the xbstream format. This stream will be processed by Bareos. If job level is incremental, XtraBackup will perform an incremental backup since the last backup – for InnoDB tables. If you have MyISAM tables, you will get a full backup of those.
You can append options to the plugin call as key=value pairs, separated by ’:’. The following options are available:
With mycnf you can make XtraBackup use a special mycnf-file with login credentials.
dumpbinary lets you modify the default command XtraBackup.
dumpoptions to modify the options for XtraBackup. Default setting is: --backup --datadir=/var/lib/mysql/ --stream=xbstream --extra-lsndir=/tmp/individual_tempdir
restorecommand to modify the command for restore. Default setting is: xbstream -x -C
strictIncremental: By default (false), an incremental backup will create data, even if the Log Sequence Number (LSN) was not increased since last backup. This is to ensure, that eventual changes to MYISAM tables get into the backup. MYISAM does not support incremental backups, you will always get a full backup of these tables. If set to true, no data will be written into backup, if the LSN was not changed.
Restore with percona XtraBackup Plugin
With the usual Bareos restore mechanism a file-hierarchy will be created on the restore client under the default restore location:
/tmp/bareos-restores/_percona/
Each restore job gets an own subdirectory, because Percona expects an empty directory. In that subdirectory, a new directory is created for every backup job that was part of the Full-Incremental sequence.
The naming scheme is: fromLSN_toLSN_jobid
Example:
/tmp/bareos-restores/_percona/351/
|-- 00000000000000000000_00000000000010129154_0000000334
|-- 00000000000010129154_00000000000010142295_0000000335
|-- 00000000000010142295_00000000000010201260_0000000338
This example shows the restore tree for restore job with ID 351. First subdirectory has all files from the first full backup job with ID 334. It starts at LSN 0 and goes until LSN 10129154.
Next line is the first incremental job with ID 335, starting at LSN 10129154 until 10142295. The third line is the 2nd incremental job with ID 338.
To further prepare the restored files, use the XtraBackup --prepare command. Read https://www.percona.com/doc/percona-xtrabackup/2.4/backup_scenarios/incremental_backup.html for more information.
Troubleshooting
If things don’t work as expected, make sure that
the Bareos File Daemon (FD) works in general, so that you can make simple file backups and restores
the Bareos FD Python plugins work in general, try one of the shipped simple sample plugins
Make sure XtraBackup works as user root, MySQL access needs to be configured properly
PostgreSQL Plugin
The PostgreSQL plugin supports an online (Hot) backup of database files and database transaction logs (WAL) archiving. With online database and transaction logs the backup plugin can perform Point-In-Time-Restore up to a single selected transaction or date/time.
This plugin uses the standard API PostgreSQL backup routines based on pg_start_backup() and pg_stop_backup().
The key features are:
Incremental backups
Point in time recovery
Backups that complete quickly and reliably
Uninterrupted transaction processing during backups
Savings on disk space and network bandwidth
Higher uptime due to faster restore time
Concept
Please make sure to read the PostgreSQL documentation about the backup and restore process: https://www.postgresql.org/docs/current/continuous-archiving.html
This is just a short outline of the tasks performed by the plugin.
Notify PostgreSQL that we want to start backup the database files using the SELECT pg_start_backup() statement
Backup database files
Notify PostgreSQL when done with file backups using the SELECT pg_stop_backup() statement
PostgreSQL will write Write-Ahead-Logfiles (WAL) into the WAL Archive directory. These transaction logs contain transactions done while the file backup proceeded
Backup fresh created WAL files
Incremental and Differential backups will only have to backup WAL files created since last reference backup.
The restore basically works like this:
Restore all files to the original PostgreSQL location
Configure PostgreSQL for the recovery (see below)
Start PostgreSQL
PostgreSQL will restore the latest possible consistent point in time. You can manage to restore to any other point in in time available in the WAL files, please refer to the PostgreSQL documentation for more details.
Prerequisites for the PostgreSQL Plugin
This plugin is a Bareos Python plugin. It requires PostgreSQL >= 9, Python 2 and the Python module psycopg2. A new version of this plugin supporting Python 3 is in development.
The plugin must be installed on the same host where the PostgreSQL database runs.
You have to enable PostgreSQL WAL-Archiving - the process and the plugin depend on it.
As a minimum this requires that you create an WAL archive directory
and matching settings in your PostgreSQL configuration file postgres.conf.
In our examples we assume the WAL archive directory as /var/lib/pgsql/wal_archive/.
...
# wal_level default is replica
wal_level = replica
archive_mode = on
archive_command = 'test ! -f /var/lib/pgsql/wal_archive/%f && cp %p /var/lib/pgsql/wal_archive/%f'
...
Please refer to the PostgreSQL documentation for details.
Note
While the PostgreSQL plugin backups only the required files from the WAL archive directory, old files are not removed automatically.
Installation of the PostgreSQL Plugin
Make sure you have met the prerequisites, after that install the package bareos-filedaemon-postgres-python-plugin.
Configuration of the PostgreSQL Plugin
Activate your plugin directory in the Bareos File Daemon configuration. See File Daemon Plugins for more about plugins in general.
Now include the plugin as command-plugin in the fileset resource and define a job using this fileset:
You can append options to the plugin call as key=value pairs, separated by :. The following options are available:
- postgresDataDir
the Postgres data directory. Default:
/var/lib/pgsql/data- walArchive
directory where Postgres archives the WAL files as defined in your
postgresql.confwith the archive_command directive. This is a mandatory option, there is no default set.- dbuser
with this user the plugin will try to connect to the database. Default: root
- dbname
there needs to be a named database for the connection. Default: postgres
- dbHost
useful, if socket is not in default location. Specify socket-directory with a leading / here
- ignoreSubdirs
a list of comma separated directories below the postgresDataDir, that will not be backed up. Default: pg_wal,pg_log,pg_xlog
- switchWal
If set to true (default), the plugin will let Postgres write a new wal file, if the current Log Sequence Number (LSN) is greater than the LSN from the previous job to make sure changes will go into the backup. Default: true
Restore with the PostgreSQL Plugin
With the usual Bareos restore mechanism a file-hierarchy will be created on the restore client under the default restore location according to the options set:
<restore prefix>/<postgresDataDir>/<restore prefix>/<walArchive>/
This example describes how to restore to the latest possible consistent point in time. You can manage to restore to any other point in in time available in the WAL files, please refer to the PostgreSQL documentation for more details.
PostgreSQL >= 12
Beginning with PostgreSQL >= 12 the configuration must be done in your PostgreSQL configuration file postgres.conf:
...
restore_command = 'cp /var/lib/pgsql/wal_archive/%f %p'
...
Additionally a (empty) file named recovery.signal must be created in your PostgreSQL datadir.
PostgreSQL < 12
For PostgreSQL < 12 you need to place a minimal recovery.conf in your PostgreSQL datadir.
Example:
restore_command = 'cp /var/lib/pgsql/wal_archive/%f %p'
Where /var/lib/pgsql/wal_archive/ is the walArchive directory.
Initiate the Recovery Process
Make sure that the user postgres is allowed to rename the recovery marker file (recovery.signal or recovery.conf),
as the file will be renamed during the recovery process.
You might have to adapt your SELINUX configuration for this.
Starting the PostgreSQL server shall now initiate the recovery process.
Troubleshooting the PostgreSQL Plugin
If things don’t work as expected, make sure that
the Bareos File Daemon (FD) works in general, so that you can make simple file backups and restores
the Bareos FD Python plugins work in general, try one of the shipped simple sample plugins
check your Postgres data directory for a file named backup_label. If it exists, another backup-process is already running. This file contains an entry like LABEL: SomeLabel. If the backup was triggered by this plugin, the label will look like: LABEL: Bareos.pgplugin.jobid.<jobid>. You may want to stop it using the SELECT pg_stop_backup() statement.
make sure your dbuser can connect to the database dbname and is allowed to issue the following statements matching your PostgreSQL version:
SELECT current_setting('server_version_num');
-- Postgres version >= 9
SELECT pg_start_backup();
SELECT pg_backup_start_time();
SELECT pg_stop_backup();
-- Postgres version >=10:
SELECT pg_current_wal_lsn();
SELECT pg_switch_wal();
-- Postgres version 9 only:
SELECT pg_current_xlog_location();
SELECT pg_switch_xlog();
Storage Daemon Plugins
autoxflate-sd
This plugin is part of the bareos-storage package.
The autoxflate-sd plugin can inflate (decompress) and deflate (compress) the data being written to or read from a device. It can also do both.
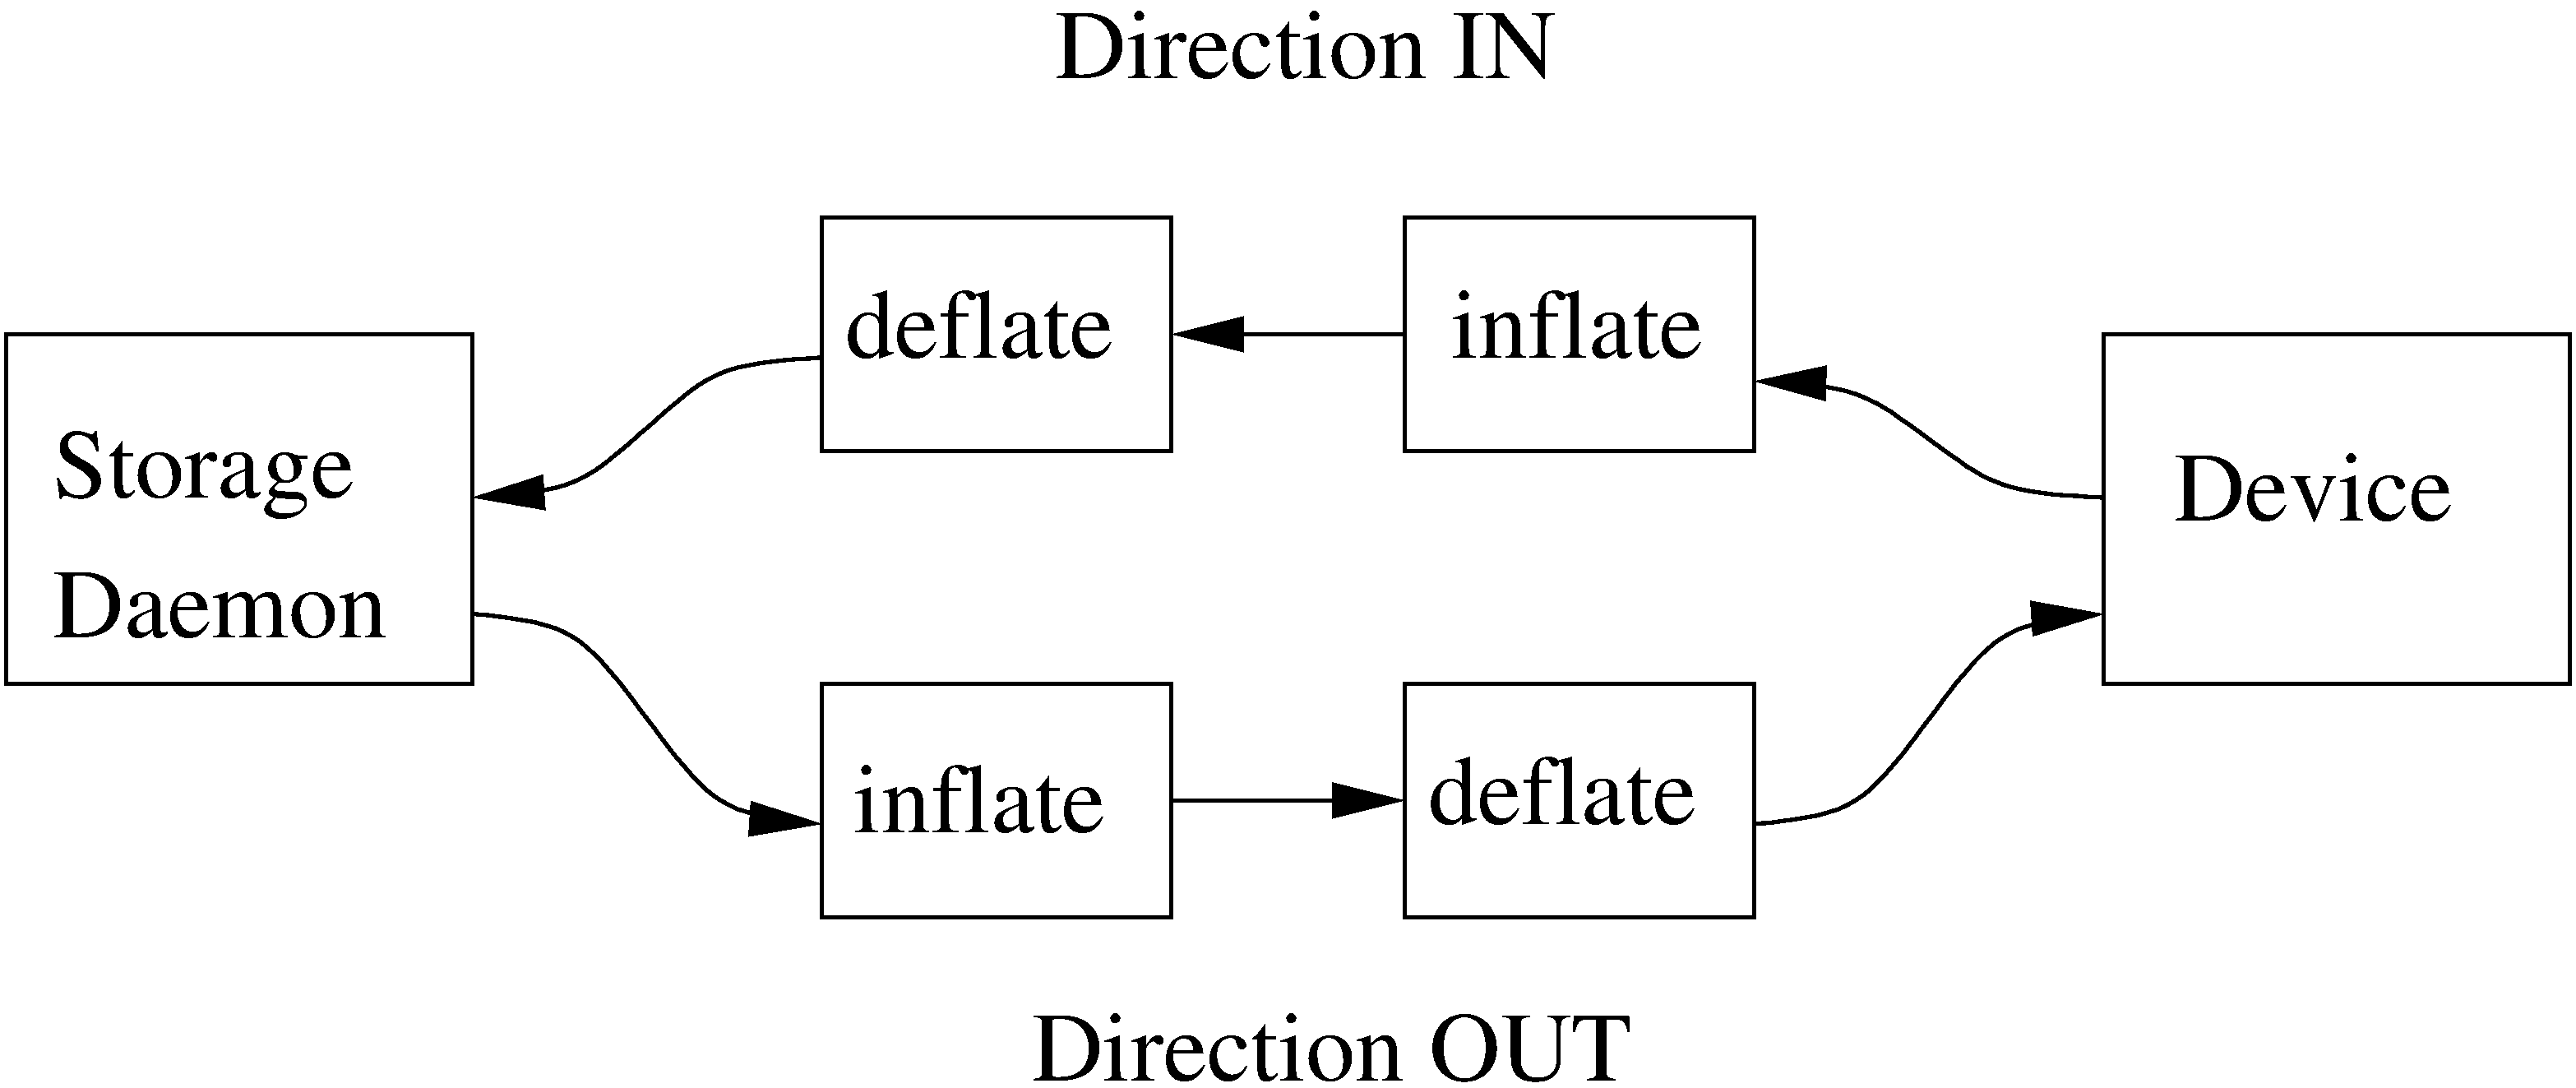
Therefore the autoxflate plugin inserts a inflate and a deflate function block into the stream going to the device (called OUT) and coming from the device (called IN).
Each stream passes first the inflate function block, then the deflate function block.
The inflate blocks are controlled by the setting of the Auto Inflate (Sd->Device) directive.
The deflate blocks are controlled by the setting of the Auto Deflate (Sd->Device), Auto Deflate Algorithm (Sd->Device) and Auto Deflate Level (Sd->Device) directives.
The inflate blocks, if enabled, will uncompress data if it is compressed using the algorithm that was used during compression.
The deflate blocks, if enabled, will compress uncompressed data with the algorithm and level configured in the according directives.
The series connection of the inflate and deflate function blocks makes the plugin very flexible.
Scenarios where this plugin can be used are for example:
client computers with weak cpus can do backups without compression and let the sd do the compression when writing to disk
compressed backups can be recompressed to a different compression format (e.g. gzip → lzo) using migration jobs
client backups can be compressed with compression algorithms that the client itself does not support
Multi-core cpus will be utilized when using parallel jobs as the compression is done in each jobs’ thread.
When the autoxflate plugin is configured, it will write some status information into the joblog.
Additional Auto Xflate On Replication (Sd->Storage) can be configured at the Storage resource.
scsicrypto-sd
This plugin is part of the bareos-storage-tape package.
General
LTO Hardware Encryption
Modern tape-drives, for example LTO (from LTO4 onwards) support hardware encryption. There are several ways of using encryption with these drives. The following three types of key management are available for encrypting drives. The transmission of the keys to the volumes is accomplished by either of the three:
A backup application that supports Application Managed Encryption (AME)
A tape library that supports Library Managed Encryption (LME)
A Key Management Appliance (KMA)
We added support for Application Managed Encryption (AME) scheme, where on labeling a crypto key is generated for a volume and when the volume is mounted, the crypto key is loaded. When finally the volume is unmounted, the key is cleared from the memory of the Tape Drive using the SCSI SPOUT command set.
If you have implemented Library Managed Encryption (LME) or a Key Management Appliance (KMA), there is no need to have support from Bareos on loading and clearing the encryption keys, as either the Library knows the per volume encryption keys itself, or it will ask the KMA for the encryption key when it needs it. For big installations you might consider using a KMA, but the Application Managed Encryption implemented in Bareos should also scale rather well and have a low overhead as the keys are only loaded and cleared when needed.
The scsicrypto-sd plugin
The scsicrypto-sd hooks into the unload, label read, label write and label verified events for loading and clearing the key. It checks whether it it needs to clear the drive by either using an internal state (if it loaded a key before) or by checking the state of a special option that first issues an encrytion status query. If there is a connection to the director and the volume information is not available, it will ask the director for the data on the currently loaded volume. If no connection is available, a cache will be used which should contain the most recently mounted volumes. If an encryption key is available, it will be loaded into the drive’s memory.
Changes in the director
The director has been extended with additional code for handling hardware data encryption. The extra keyword encrypt on the label of a volume will force the director to generate a new semi-random passphrase for the volume, which will be stored in the database as part of the media information.
A passphrase is always stored in the database base64-encoded. When a so called Key Encryption Key is set in the config of the director, the passphrase is first wrapped using RFC3394 key wrapping and then base64-encoded. By using key wrapping, the keys in the database are safe against people sniffing the info, as the data is still encrypted using the Key Encryption Key (which in essence is just an extra passphrase of the same length as the volume passphrases used).
When the storage daemon needs to mount the volume, it will ask the director for the volume information and that protocol is extended with the exchange of the base64-wrapped encryption key (passphrase). The storage daemon provides an extra config option in which it records the Key Encryption Key of the particular director, and as such can unwrap the key sent into the original passphrase.
As can be seen from the above info we don’t allow the user to enter a passphrase, but generate a semi-random passphrase using the openssl random functions (if available) and convert that into a readable ASCII stream of letters, numbers and most other characters, apart from the quotes and space etc. This will produce much stronger passphrases than when requesting the info from a user. As we store this information in the database, the user never has to enter these passphrases.
The volume label is written in unencrypted form to the volume, so we can always recognize a Bareos volume. When the key is loaded onto the drive, we set the decryption mode to mixed, so we can read both unencrypted and encrypted data from the volume. When no key or the wrong key has been loaded, the drive will give an IO error when trying to read the volume. For disaster recovery you can store the Key Encryption Key and the content of the wrapped encryption keys somewhere safe and the bscrypto tool together with the scsicrypto-sd plugin can be used to get access to your volumes, in case you ever lose your complete environment.
If you don’t want to use the scsicrypto-sd plugin when doing DR and you are only reading one volume, you can also set the crypto key using the bscrypto tool. Because we use the mixed decryption mode, in which you can read both encrypted and unencrypted data from a volume, you can set the right encryption key before reading the volume label.
If you need to read more than one volume, you better use the scsicrypto-sd plugin with tools like bscan/bextract, as the plugin will then auto-load the correct encryption key when it loads the volume, similiarly to what the storage daemon does when performing backups and restores.
The volume label is unencrypted, so a volume can also be recognized by a non-encrypted installation, but it won’t be able to read the actual data from it. Using an encrypted volume label doesn’t add much security (there is no security-related info in the volume label anyhow) and it makes it harder to recognize either a labeled volume with encrypted data or an unlabeled new volume (both would return an IO-error on read of the label.)
Configuration of the scsicrypto-sd plugin
SCSI crypto setup
The initial setup of SCSI crypto looks something like this:
Generate a Key Encryption Key e.g.
bscrypto -g -
For details see bscrypto.
Security Setup
Some security levels need to be increased for the storage daemon to be able to use the low level SCSI interface for setting and getting the encryption status on a tape device.
The following additional security is needed for the following operating systems:
Linux (SG_IO ioctl interface):
The user running the storage daemon needs the following additional capabilities:
CAP_SYS_RAWIO (see capabilities(7))
On older kernels you might need CAP_SYS_ADMIN. Try CAP_SYS_RAWIO first and if that doesn’t work try CAP_SYS_ADMIN
If you are running the storage daemon as another user than root (which has the CAP_SYS_RAWIO capability), you need to add it to the current set of capabilities.
If you are using systemd, you could add this additional capability to the CapabilityBoundingSet parameter.
For systemd add the following to the bareos-sd.service: Capabilities=cap_sys_rawio+ep
You can also set up the extra capability on bscrypto and bareos-sd by running the following commands:
setcap cap_sys_rawio=ep bscrypto
setcap cap_sys_rawio=ep bareos-sd
Check the setting with
getcap -v bscrypto
getcap -v bareos-sd
getcap and setcap are part of libcap-progs.
If bareos-sd does not have the appropriate capabilities, all other tape operations may still work correctly, but you will get “Unable to perform SG_IO ioctl” errors.
Solaris (USCSI ioctl interface):
The user running the storage daemon needs the following additional privileges:
PRIV_SYS_DEVICES (see privileges(5))
If you are running the storage daemon as another user than root (which has the PRIV_SYS_DEVICES privilege), you need to add it to the current set of privileges. This can be set up by setting this either as a project for the user, or as a set of extra privileges in the SMF definition starting the storage daemon. The SMF setup is the cleanest one.
For SMF make sure you have something like this in the instance block:
Changes in bareos-sd.conf
Set the Key Encryption Key
Key Encryption Key (Sd->Director)= passphrase
Enable the loading of storage daemon plugins
Plugin Directory (Sd->Storage)=path_to_sd_plugins
Enable the SCSI encryption option
Enable this, if you want the plugin to probe the encryption status of the drive when it needs to clear a pending key
Changes in bareos-dir.conf
Set the Key Encryption Key
Key Encryption Key (Dir->Director)= passphrase
Testing
Restart the Storage Daemon and the Director. After this you can label new volumes with the encrypt option, e.g.
Disaster Recovery
For Disaster Recovery (DR) you need the following information:
Actual bareos-sd.conf with config options enabled as described above, including, among others, a definition of a director with the Key Encryption Key used for creating the encryption keys of the volumes.
The actual keys used for the encryption of the volumes.
This data needs to be availabe as a so called crypto cache file which is used by the plugin when no connection to the director can be made to do a lookup (most likely on DR).
Most of the times the needed information, e.g. the bootstrap info, is available on recently written volumes and most of the time the encryption cache will contain the most recent data, so a recent copy of the bareos-sd.<portnr>.cryptoc file in the working directory is enough most of the time. You can also save the info from database in a safe place and use bscrypto to populate this info (VolumeName → EncryptKey) into the crypto cache file used by
bextract and bscan. You can use bscrypto with the following flags to create a new or update an existing crypto cache file e.g.:
bscrypto -p /var/lib/bareos/bareos-sd.<portnr>.cryptoc
A valid BSR file containing the location of the last safe of the database makes recovery much easier. Adding a post script to the database save job could collect the needed info and make sure its stored somewhere safe.
Recover the database in the normal way e.g. for postgresql:
bextract -D <director_name> -c bareos-sd.conf -V <volname> \ /dev/nst0 /tmp -b bootstrap.bsr
/usr/lib64/bareos/create_bareos_database
/usr/lib64/bareos/grant_bareos_privileges
psql bareos < /tmp/var/lib/bareos/bareos.sql
Or something similar (change paths to follow where you installed the software or where the package put it).
Note: As described at the beginning of this chapter, there are different types of key management, AME, LME and KMA. If the Library is set up for LME or KMA, it probably won’t allow our AME setup and the scsi-crypto plugin will fail to set/clear the encryption key. To be able to use AME you need to “Modify Encryption Method” and set it to something like “Application Managed”. If you decide to use LME or KMA you don’t have to bother with the whole setup of AME which may for big libraries be easier, although the overhead of using AME even for very big libraries should be minimal.
scsitapealert-sd
This plugin is part of the bareos-storage-tape package.
python-sd Plugin
The python-sd plugin behaves similar to the python-dir Plugin.
Director Plugins
python-dir Plugin
The python-dir plugin is intended to extend the functionality of the Bareos Director by Python code. A working example is included.
install the bareos-director-python-plugin package
change to the Bareos plugin directory (
/usr/lib/bareos/plugins/or/usr/lib64/bareos/plugins/)copy
bareos-dir.py.templatetobareos-dir.pyactivate the plugin in the Bareos Director configuration
restart the Bareos Director
change
bareos-dir.pyas requiredrestart the Bareos Director
Loading plugins
Since Version >= 14.4.0 multiple Python plugins can be loaded and plugin names can be arbitrary. Before this, the Python plugin always loads the file bareos-dir.py.
The director plugins are configured in the Job-Resource (or JobDefs resource). To load a Python plugin you need
pointing to your plugin directory (needs to be enabled in the Director resource, too
Your plugin (without the suffix .py)
default is ’0’, you can leave this, as long as you only have 1 Director Python plugin. If you have more than 1, start with instance=0 and increment the instance for each plugin.
You can add plugin specific option key-value pairs, each pair separated by ’:’ key=value
Single Python Plugin Loading Example:
Multiple Python Plugin Loading Example:
Write your own Python Plugin
Some plugin examples are available on https://github.com/bareos/bareos-contrib. The class-based approach lets you easily reuse stuff already defined in the baseclass BareosDirPluginBaseclass, which ships with the bareos-director-python-plugin package. The examples contain the plugin bareos-dir-nsca-sender, that submits the results and performance data of a backup job directly to Icinga:index:<single: Icinga> or Nagios:index:<single: Nagios|see{Icinga}> using the NSCA protocol.