The Windows Version of Bareos
The Windows version of Bareos is a native Win32 port, but there are very few source code changes to the Unix code, which means that the Windows version is for the most part running code that has long proved stable on Unix systems.
Chapter Operating Systems shows, what Windows versions are supported.
The Bareos component that is most often used in Windows is the File daemon or Client program. As a consequence, when we speak of the Windows version of Bareos below, we are mostly referring to the File daemon (client).
Once installed Bareos normally runs as a system service. This means that it is immediately started by the operating system when the system is booted, and runs in the background even if there is no user logged into the system.
Windows Installation
Normally, you will install the Windows version of Bareos from the binaries.
The Windows version of Bareos winbareos binary packages are provided
in the windows directory of the Bareos release directory.
The current Bareos Community Repository is at https://download.bareos.org/current/windows/
while the Bareos Subscription Repository of Bareos release 25 is at
https://download.bareos.com/bareos/release/25/windows/.
This install is standard Windows .exe that runs an install wizard using the NSIS Free Software installer, so if you have already installed Windows software, it should be very familiar to you. Providing you do not already have Bareos installed, the installer installs the binaries and dlls in C:\Program Files\Bareos and the configuration files in C:\ProgramData\Bareos (for Windows XP and older:
C:\Documents and Settings\All Users\Application Data\Bareos).
In addition, the Start->All Programs->Bareos menu item will be created during the installation, and on that menu, you will find items for editing the configuration files, displaying the document, and starting a user interface.
During installation you can decide, what Bareos components you want to install.
Typically, you only want to install the Bareos Client (Bareos File Daemon) and optionally some interface tools on a Windows system. Normally, we recommend to let the server components run on a Linux or other Unix system. However, it is possible, to run the Bareos Director, Bareos Storage Daemon and Bareos WebUI on a Windows systems. You should be aware about following limitations:
Limitation - Windows: Storage Daemon only supports backup to disk, not to tape.
The Windows version of the Bareos Storage Daemon currently only supports backup to disk. Access to tape devices and to media changers is not supported.
Limitation - Windows: The default installation of |webui| is only suitable for local access.
Normally the Bareos WebUI is running on a Apache server on Linux. While it is possible, to run the Bareos WebUI under Apache or another Webserver which supports PHP under Windows, the configuration shipped the the winbareos package uses the PHP internal webserver. This is okay for local access, but not suitable for being accessed via the network. To guarantee this, it is configured to only listen locally (http://localhost:9100).
Graphical Installation
Here are the important steps.
You must be logged in as an Administrator to the local machine to do a correct installation, if not, please do so before continuing.
For a standard installation you may only select the “Tray-Monitor” and the “Open Firewall for Client” as additional optional components.

You need to fill in the name of your bareos director in the client configuration dialogue and the FQDN or ip address of your client.
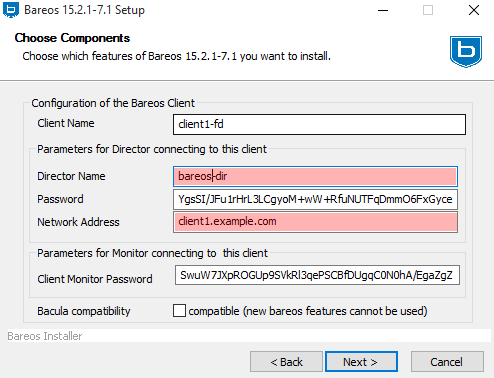
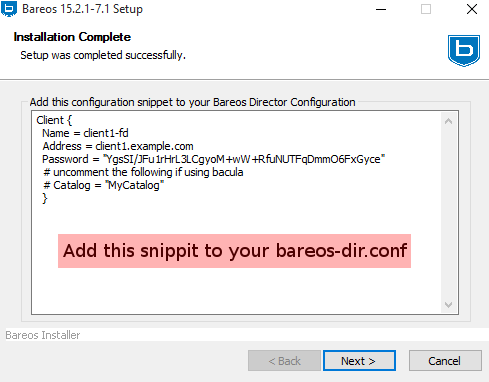
Add the client resource to your Bareos Director Configuration and a job resource for the client as it is also described in the default bareos-dir.conf
Command Line (Silent) Installation
Silent installation is possible since Version >= 12.4.4. All inputs that are given during interactive install can now directly be configured on the commandline, so that an automatic silent install is possible.
Commandline Switches
- /?
shows the list of available parameters.
- /S
sets the installer to silent. The Installation is done without user interaction. This switch is also available for the uninstaller.
- /CLIENTADDRESS
network address of the client
- /CLIENTNAME
sets the name of the client resource
- /CLIENTMONITORPASSWORD
sets the password for monitor access
- /CLIENTPASSWORD
sets the password to access the client
- /DBADMINUSER=user
sets the database admin user, default=postgres. Version >= 14.2.1
- /DBADMINPASSWORD=password
sets the database admin password, default=none. Version >= 14.2.1
- /DIRECTORADDRESS
sets network address of the director for bconsole access
- /DIRECTORNAME
sets the name of the director to access the client and of the director to accessed by bconsole
- /DIRECTORPASSWORD
set the password to access the director
- /SILENTKEEPCONFIG
keep configuration files on silent uninstall and use exinsting config files during silent install. Version >= 12.4.4
- /INSTALLDIRECTOR
install the Bareos Director (and bconsole). Version >= 14.2.1
- /INSTALLSTORAGE
install the Bareos Storage Daemon. Version >= 14.2.1
- /WRITELOGS
makes the installer write a log file. Version >= 14.2.1
- /D=:file:C:specifyinstallationdirectory
(Important: It has to be the last option!)
By setting the Installation Parameters via commandline and using the silent installer, you can install the bareos client without having to do any configuration after the installation e.g. as follows:
c:\winbareos.exe /S /CLIENTNAME=hostname-fd /CLIENTPASSWORD="verysecretpassword" /DIRECTORNAME=bareos-dir
DBADMINUSER and DBADMINPASSWORD are used to create the bareos databases. If login is not possible silent installer will abort
Volume Shadow Copy Service (VSS)
VSS is available since Windows XP. From the perspective of a backup-solution for Windows, this is an extremely important step. VSS allows Bareos to backup open files and even to interact with applications like RDBMS to produce consistent file copies. VSS aware applications are called VSS Writers, they register with the OS so that when Bareos wants to do a Snapshot, the OS will notify the register Writer programs, which may then create a consistent state in their application, which will be backed up. Examples for these writers are “MSDE” (Microsoft database engine), “Event Log Writer”, “Registry Writer” plus 3rd party-writers. If you have a non-vss aware application a shadow copy is still generated and the open files can be backed up, but there is no guarantee that the file is consistent.
Bareos produces a message from each of the registered writer programs when it is doing a VSS backup so you know which ones are correctly backed up.
Technically Bareos creates a shadow copy as soon as the backup process starts. It does then backup all files from the shadow copy and destroys the shadow copy after the backup process. Please have in mind, that VSS creates a snapshot and thus backs up the system at the state it had when starting the backup. It will disregard file changes which occur during the backup process.
VSS can be turned on by placing an
Enable VSS = yes
in your FileSet resource.
The VSS aware File daemon has the letters VSS on the signon line that it produces when contacted by the console. For example:
bareos-fd Version: 14.2.6 (07 Dec 2015) VSS Windows XP MVS NT 5.1.2600
the VSS is shown in the line above. This only means that the File daemon is capable of doing VSS not that VSS is turned on for a particular backup. There are two ways of telling if VSS is actually turned on during a backup. The first is to look at the status output for a job, e.g.:
Running Jobs:
JobId 1 Job NightlySave.2015-07-23_13.25.45 is running.
    VSS Backup Job started: 23-Jul-05 13:25
    Files=70,113 Bytes=3,987,180,650 Bytes/sec=3,244,247
    Files Examined=75,021
    Processing file: c:/Documents and Settings/user/My Documents/My Pictures/Misc1/Sans titre - 39.pdd
    SDReadSeqNo=5 fd=352
Here, you see under Running Jobs that JobId 1 is “VSS Backup Job started …” This means that VSS is enabled for that job. If VSS is not enabled, it will simply show “Backup Job started …” without the letters VSS.
The second way to know that the job was backed up with VSS is to look at the Job Report, which will look something like the following:
23-Jul 13:25 bareos-dir: Start Backup JobId 1, Job=NightlySave.2015-07-23_13.25.45
23-Jul 13:26 bareos-sd: Labeled new Volume "TestVolume001" on device "DDS-4" (/dev/nst0)
23-Jul 13:26 bareos-sd: Spooling data ...
23-Jul 13:26 bareos-fd: Generate VSS snapshots. Driver="VSS WinXP", Drive(s)="C"
23-Jul 13:26 bareos-fd: VSS Writer: "MSDEWriter", State: 1 (VSS_WS_STABLE)
23-Jul 13:26 bareos-fd: VSS Writer: "Microsoft Writer (Bootable State)", State: 1 (VSS_WS_STABLE)
23-Jul 13:26 bareos-fd: VSS Writer: "WMI Writer", State: 1 (VSS_WS_STABLE)
23-Jul 13:26 bareos-fd: VSS Writer: "Microsoft Writer (Service State)", State: 1 (VSS_WS_STABLE)
In the above Job Report listing, you see that the VSS snapshot was generated for drive C (if other drives are backed up, they will be listed on the Drive(s)="C" line. You also see the reports from each of the writer program. Here they all report VSS_WS_STABLE, which means that you will get a consistent snapshot of the data handled by that writer.
Windows Compatibility Considerations
Exclusively Opened Files
If you are not using the Volume Shadow Copy Service (VSS) option and if any applications are running during the backup and they have files opened exclusively, Bareos will not be able to backup those files, so be sure you close your applications (or tell your users to close their applications) before the backup. Fortunately, most Microsoft applications do not open files exclusively so that they can be backed up. However, you will need to experiment. In any case, if Bareos cannot open the file, it will print an error message, so you will always know which files were not backed up. If Volume Shadow Copy Service is enabled, Bareos is able to backing up any file.
Windows Reparse Points
Version >= 12.4.5
Besides normal files and directories, Windows filesystems also support special files, called “Reparse Points”. Bareos can handle the following types of Reparse points:
Symbolic links to directories
Symbolic links to files
Junction Points
Volume Mount Points
The Volume Mount Points are a special case of a Junction Point. To make things easier, in the following when talking about Junction Points, we mean only the Junction Points that are not Volume Mount Points.
The Symbolic Links and the Junction Points are comparable to Symbolic Links in Unix/Linux. They are files that point to another location in the filesystem.
Symbolic Links and Junction Points can be created with the Windows commandline command mklink.
When doing a directory listing in the commandline (cmd) in Windows, it shows the filetypes JUNCTION, SYMLINK or SYMLINKD and the target between the square brackets:
C:\linktest>dir
 Volume in drive C has no label.
 Volume Serial Number is C8A3-971F

 Directory of C:\linktest

08/07/2014  03:05 PM    <DIR>          .
08/07/2014  03:05 PM    <DIR>          ..
08/07/2014  02:59 PM    <SYMLINKD>     dirlink [C:\Program Files\Bareos]
08/07/2014  03:02 PM    <SYMLINK>      filelink [C:\Program Files\Bareos\bareos-dir.exe]
08/07/2014  03:00 PM    <JUNCTION>     junction [C:\Program Files\Bareos]
08/07/2014  03:05 PM    <JUNCTION>     volumemountpoint [\??\Volume{e960247d-09a1-11e3-93ec-005056add71d}\]
               1 File(s)              0 bytes
               5 Dir(s)  90,315,137,024 bytes free
Symbolic Links. Directory Symbolic Links, and Junctions that are not a Volume MountPoint are treated by Bareos as symbolic links and are backed up and restored as they are, so the object is restored and points to where it pointed when it was backed up.
Volume Mount Points are different. They allow to mount a harddisk partition as a subfolder of a drive instead of a driveletter.
When backing up a Volume Mount Point, it is backed up as directory.
If OneFS is set to yes (default), the Volume Mount Point (VMP) is backed up as directory but the content of the VMP will not be backed up. Also, the Joblog will contain a message like this:
This is the normal behavior of the OneFS option.
If OneFS is set to no, the filedaemon will change into the VMP as if it was a normal directory and will backup all files found inside of the VMP.
VMPs and VSS Snapshots
As Virtual Mount Points mounts another Volume into the current filesystem, it is desired that if the content of the VMP will be backed up during the backup (onefs = no), we also want to have this volume snapshotted via VSS.
To achieve this, we now automatically check every volume added to the VSS snapshotset if it contains VMPs, and add the volumes mounted by those VMPs to the vss snapshotset recursively.
Volumes can be mounted nested and multiple times, but can only be added to the snapshotset once. This is the reason why the number of vmps can be greater than the number of volumes added for the volume mount points.
The Job Log will show how many VMPs were found like this:
Accordingly, if OneFS is set to yes, we do not need to handle Volume Mount Points this way. If OneFS is set to yes (default), the joblog will contain the following information:
Hard Links
Windows also supports hard links, even so they are seldom used. These are treated as normal files and will be restored as individual files (which will not be hard links again)
FilesNotToBackup Registry Key
Version >= 14.2.0
Windows supports a special Registry Key that specifies the names of the files and directories that backup applications should not backup or restore.
The full path to this registry key is HKEY_LOCAL_MACHINE\SYSTEM\CurrentControlSet\Control\BackupRestore\FilesNotToBackup
Bareos automatically converts these entries to wildcards which will be automatically excluded from backup.
The backup log shows a short information about the creation of the excludes like this:
More details can be found if the filedaemon is run in debug mode inside of the bareos-fd.trace logfile. Each entry and the resulting wildcard are logged.
It is possible to disable this functionality by setting the FileSet option AutoExclude to no.
The JobLog will then show the following informational line:
For more details about the Windows registry key see https://learn.microsoft.com/en-us/windows/win32/backup/registry-keys-for-backup-and-restore.
Windows dedup support
Version >= 12.4.5
Windows 2012 has dedup support which needs handling.
Store all file attributes
Version >= 12.4.5
Windows has gathered quite some special specific file flags over the years but not all are saved during backup so some are never restored by the restore process. The most important ones are the ARCHIVE flag which is “misused” by some programs for storing some special information. Others that are known not to be stored are the COMPRESSED flag which means that a restored file looses it and will be restored as an uncompressed file.
Support for Windows EFS filesystems
Version >= 12.4.5
Windows has support for a so called EFS filesystem. This is an encrypted filesystem, to be able to backup the data and to restore it we need to use a special API. With this API you in essence export the data on backup and import it on restore. This way you never have access to the unencrypted data but just import and export the encrypted data. This is the cleanest way of handling encryption by just seeing the data as some opaque data and not try to do anything special with it.
Backup/Restore of Windows Registry
The Windows Registry can be backed up using VSS. The VSS Registry Writer will make sure you can take a stable backup of the registry hives.
The Registry is structured as different hives that are stored in separate files.
You can find a list of hives with the corresponding files in the Registry itself under HKLM\System\CurrentControlSet\Control\hivelist.
By backing up the file that one of the hives is stored in, you’ll get a backup of that part of the Registry.
Well-Known Hives
Registry Key |
File Location |
Description |
|---|---|---|
HKU\<User-SID> |
%systemdrive%\Users\%username%\NTUSER.DAT |
User Registry (each users’s HKCU) |
HKLM\BCD00000000 |
\Device\HarddiskVolume1\Boot\BCD |
Boot Configuration Database |
HKLM\COMPONENTS |
%systemroot%\System32\config\COMPONENTS |
Component Based Servicing |
HKLM\HARDWARE |
in-memory only |
Hardware information determined at runtime |
HKLM\SAM |
%systemroot%\System32\config\SAM |
Security Accounts Manager |
HKLM\SECURITY |
%systemroot%\System32\config\SECURITY |
Security Policies and User Permission |
HKLM\SOFTWARE |
%systemroot%\System32\config\SOFTWARE |
System-wide settings, Application Settings |
HKLM\SYSTEM |
%systemroot%\System32\config\SYSTEM |
Startup config, drivers and system services |
HKU\.DEFAULT |
%systemroot%\System32\config\.DEFAULT |
User Hive for Local System |
HKU\S-1-5-18 |
%systemroot%\System32\config\.DEFAULT |
User Hive for Local System (alternate path) |
HKU\S-1-5-19 |
%systemroot%\ServiceProfiles\LocalService\Ntuser.dat |
User Hive for Local Service |
HKU\S-1-5-20 |
%systemroot%\ServiceProfiles\NetworkService\Ntuser.dat |
User Hive for Network Service |
Restoring the Registry
To restore a part of the Registry, you simply restore the file containing the appropriate hive to another location on the machine. You can then use regedit to open (“mount”) that restored hive file by selecting “Load Hive” in the “Registry” menu. With the hive mounted you can now export keys or subtrees from the mounted hive and import these at any other location.
Once you’re finished you should unload the hive using “Unload Hive” from the “Registry” menu.
Dumping the Windows Registry
You write the registry content out to an ASCII file using regedit /e.
Windows Firewalls
The Windows builtin Firewall is enabled since Windows version WinXP SP2. The Bareos installer opens the required network ports for Bareos. However, if you are using another Firewall, you might need to manually open the Bareos network ports. The Bareos File Daemon listens on 9102/TCP.
Network TCP Port
If you want to see if the File daemon has properly opened the port and is listening, you can enter the following command in a shell window:
netstat -an | findstr 910[123]
Windows Antivirus
The Windows builtin antivirus Defender is enabled by default and will scan every single file being backed up during the backup process. This leads to an extremely slow throughput with a very high cpu load.
Therefore it is advised to add the bareos-fd.exe to the list of excluded monitored processes on computers being backed up via the bareos filedaemon. On systems running the director or storage daemon on windows, also add the processes bareos-dir.exe, bareos-sd.exe
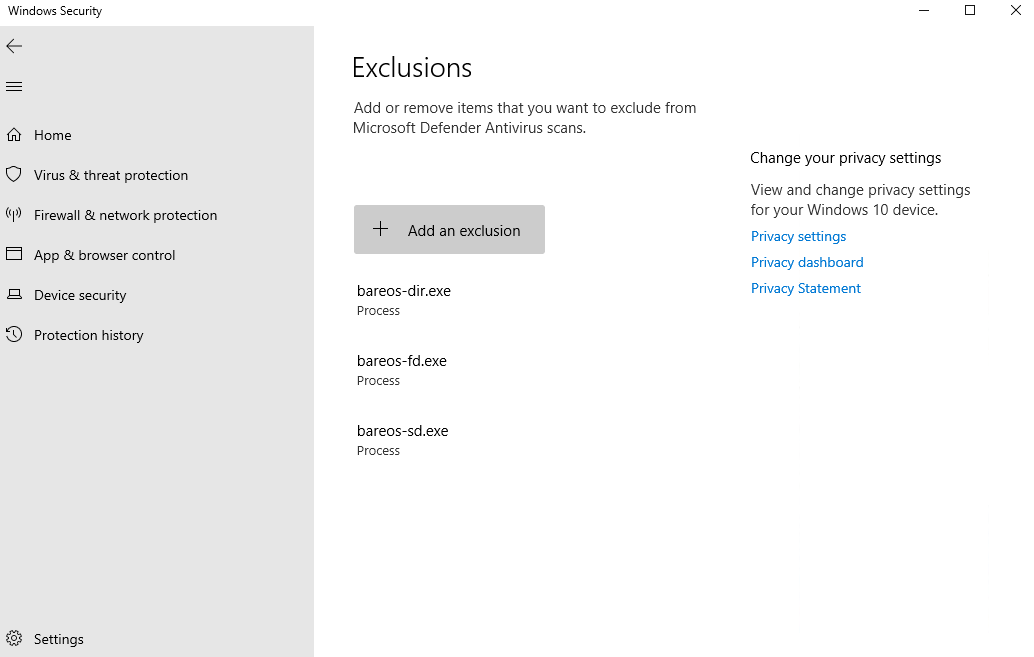
The same remark can be done to any other similar on-access antivirus scanner. Please also check next section about possible troubles with antivirus on Windows.
Dealing with Windows Problems
Antivirus Program
If you are not using the portable option, and you have Enable VSS (Dir->Fileset) (Volume Shadow Copy) enabled in the Bareos Director and you experience problems with Bareos not being able to open files, it is most likely that you are running an antivirus program that blocks Bareos from doing certain operations. In this case, disable the antivirus program and try another backup. If it succeeds, either get a different (better) antivirus program or use
something like Client Run Before Job (Dir->Job)/Client Run After Job (Dir->Job) to turn off the antivirus program while the backup is running.
If turning off anti-virus software does not resolve your VSS problems, you might have to turn on VSS debugging. The following link describes how to do this: https://learn.microsoft.com/en-us/troubleshoot/windows-server/backup-and-storage/enable-debug-tracing-features-vss.
Enable Debugging
In case of problems, you can enable the creation of log files. For this you have to use the bconsole setdebug command:
*setdebug client=bareos-fd level=200 trace=1
Connecting to Client bareos-fd at bareos.example.com:9102
2000 OK setdebug=200 trace=1 hangup=0 tracefile=c:\bareos-fd.trace
Please see the chapter Debugging for additional information.
Extracting Windows Event Log
In case of problems, you can extract Windows Event Log to text based files, which are often easier to parse. For this you have to use the powershell console
Get-EventLog -LogName Application -Source Bareos | Select -First 1000 | Export-Csv "C:\temp\bareos.csv" -NoTypeInformation -UseCulture
Please consult the powershell reference book for additional information.
Error Read Access is denied
If during a Backup, you get the message: ERR=Access is denied and you are using the portable option, you should try adding both the non-portable (backup API) and the Volume Shadow Copy options to your Fileset’s conf file.
In the Include Options resource:
portable = no
In the FileSet resource:
enablevss = yes
In general, specifying these two options should allow you to backup any file on a Windows system. However, in some cases, if users have allowed to have full control of their folders, even system programs such a Bareos can be locked out. In this case, you must identify which folders or files are creating the problem and do the following:
Grant ownership of the file/folder to the Administrators group, with the option to replace the owner on all child objects.
Grant full control permissions to the Administrators group, and change the user’s group to only have Modify permission to the file/folder and all child objects.
Thanks to Georger Araujo for the above information.
Error VSS could not grow in time
If during a Backup, you get this kind of message in the job log:
Could not stat "D:/examples_dir/sample_file.doc": ERR=The system cannot find the file specified.
Could not stat "D:/examples_dir/Documents": ERR=Access is denied.
You are maybe facing a VSS snapshot size problem: the shadow copy storage could not grow in time, and thus the system removes the snapshot in use during the backup. Of course this invalidates access to data that should be saved during the job by the Bareos File Daemon. Unfortunately such operations are not reported to the Bareos File Daemon, which gets read and access deny errors when trying to access the data.
Checking the Windows system log around the time the problem occur in the backup job should show this kind of error logged.
Log Name:      System
Source:        Volsnap
Date:          9/26/2022 2:13:27 AM
Event ID:      25
Task Category: None
Level:         Error
Keywords:      Classic
User:          N/A
Computer:      bareos-windows-fd
Description:
The shadow copies of volume D: were deleted because the shadow copy storage could
not grow in time.  Consider reducing the IO load on the system or choose a shadow
copy storage volume that is not being shadow copied.
Event Xml:
<Event xmlns="http://schemas.microsoft.com/win/2004/08/events/event">
<System>
   <Provider Name="Volsnap" Guid="{cb017cd2-1f37-4e65-82bc-3e91f6a37559}" EventSourceName="volsnap" />
   <EventID Qualifiers="49158">25</EventID>
   <Version>0</Version>
   <Level>2</Level>
   <Task>0</Task>
   <Opcode>0</Opcode>
   <Keywords>0x80000000000000</Keywords>
   <TimeCreated SystemTime="2022-09-26T00:13:27.611447600Z" />
   <EventRecordID>1151393</EventRecordID>
   <Correlation />
   <Execution ProcessID="4" ThreadID="278416" />
   <Channel>System</Channel>
   <Computer>bareos-windows-fd</Computer>
   <Security />
</System>
<EventData>
   <Data Name="DeviceName">\Device\HarddiskVolumeShadowCopy293</Data>
   <Data Name="VolumeName">D:</Data>
   <Data Name="NTSTATUS">00000000</Data>
   <Data Name="SourceTag">168</Data>
   <Data Name="SourceFileID">0x0005</Data>
   <Data Name="SourceLine">2618</Data>
   <Binary>000000000600300000000000190006C0A80000000000000090000000000000000000000000000000</Binary>
</EventData>
</Event>
You need to find a way to extend your VSS disk space.
Warning
Beside the job has serious issue, the snapshot removal is not reported to the Bareos File Daemon, and as such the backup job often terminated with a status of “OK – with warnings” W status.
VSS hanging on MSDE
If you are experiencing problems such as VSS hanging on MSDE, first try running vssadmin to check for problems, then try running Windows Backup Feature which also uses VSS to see if it has similar problems. If so, you know that the problem is in your Windows machine and not with Bareos.
The FD hang problems were reported with MSDEwriter when:
a local firewall locked local access to the MSDE TCP port (MSDEwriter seems to use TCP/IP and not Named Pipes).
msdtcs was installed to run under “localsystem”: try running msdtcs under networking account (instead of local system) (com+ seems to work better with this configuration).
Windows Restore Problems
Please see the Restoring on Windows chapter for problems that you might encounter doing a restore.
Windows Ownership and Permissions Problems
If you restore files backed up from Windows to an alternate directory, Bareos may need to create some higher level directories that were not saved (or restored). In this case, the File daemon will create them under the SYSTEM account because that is the account that Bareos runs under as a service and with full access permission. However, there may be cases where you have problems accessing those files even if you run as administrator. In principle, Microsoft supplies you with the way to cease the ownership of those files and thus change the permissions. However, a much better solution to working with and changing Win32 permissions is the program SetACL, which can be found at https://helgeklein.com/setacl/.
If you have not installed Bareos while running as Administrator and if Bareos is not running as a Process with the userid (User Name) SYSTEM, then it is very unlikely that it will have sufficient permission to access all your files.
Some users have experienced problems restoring files that participate in the Active Directory. They also report that changing the userid under which Bareos (bareos-fd.exe) runs, from SYSTEM to a Domain Admin userid, resolves the problem.
Advanced Windows Configuration
Windows Service
The Bareos File Daemon (and also the Bareos Director and Bareos Storage Daemon) is started as a Windows service.
This is configured in the Registry at
HKEY_LOCAL_MACHINE\SYSTEM\CurrentControlSet\services\Bareos-fd
You can use the command regedit to modify the settings.
E.g. to always start Bareos in debug mode, modify HKEY_LOCAL_MACHINE\SYSTEM\CurrentControlSet\services\Bareos-fd ImagePath from
"C:\Program Files\Bareos\bareos-fd.exe" /service
to
"C:\Program Files\Bareos\bareos-fd.exe" /service -d200
After restarting the service, you will find a file called C:bareos-fd.trace which will contain the debug output created by the daemon.
Installing multiple Windows filedaemon services
It is possible to run multiple Bareos File Daemon instances on Windows. To achieve this, you need to create a service for each instance, and a configuration directory that at least has a individual port for each instance.
To create two bareos-fd services, you can call the following service create calls on the commandline on windows as administrator:
sc create bareosfd2 binpath="\"C:\Program Files\Bareos\bareos-fd.exe\" /service -c \"C:\ProgramData\Bareos2\"" depend= "tcpip/afd"
This will create a second Bareos File Daemon service with the name bareosfd2.
The configuration directories for the two services is "C:\ProgramData\Bareos2\" needs to have different network settings.
The service can be started by calling
sc start bareosfd2
Windows Specific Command Line Options
These options are not normally seen or used by the user, and are documented here only for information purposes. At the current time, to change the default options, you must either manually run Bareos or you must manually edit the system registry and modify the appropriate entries.
In order to avoid option clashes between the options necessary for Bareos to run on Windows and the standard Bareos options, all Windows specific options are signaled with a forward slash character (/), while as usual, the standard Bareos options are signaled with a minus (-), or a minus minus (--). All the standard Bareos options can be used on the Windows version. In addition, the following Windows only options are implemented:
- /service
Start Bareos as a service
- /run
Run the Bareos application
- /install
Install Bareos as a service in the system registry
- /remove
Uninstall Bareos from the system registry
- /about
Show the Bareos about dialogue box
- /status
Show the Bareos status dialogue box
- /events
Show the Bareos events dialogue box (not yet implemented)
- /kill
Stop any running Bareos
- /help
Show the Bareos help dialogue box
It is important to note that under normal circumstances the user should never need to use these options as they are normally handled by the system automatically once Bareos is installed. However, you may note these options in some of the .bat files that have been created for your use.